In this article we will learn about the Hangfire - .Net Library to make our background tasks and jobs easier in ASP.NET 5.0. As we all know, its newly launched Framework officially released in November. Here I am sharing the link to install the SDK for .Net 5
Prerequisites
What is Hangfire and why do I need background tasks.
Setup and Configure Hangfire
Secure the Hangfire Dashboard.
Hangfire Retention Time.
Persistence with SQL Database.
What is Hangfire and why do we need to use this?
Hangfire is a .Net Library which helps to create background tasks and make jobs easier in .Net applications. It supports all types of tasks like "fire and forget" and "recurring" and continous jobs as well. You can learn more about this here: Hangfire
Why do I need background tasks?
Background tasks are important in cases where you need to perform an operation or to schedule a task for a particular time. With the background task, the process can continue running in the background where the user cannot wait for the step by step process.
Setup and Configure Hangfire
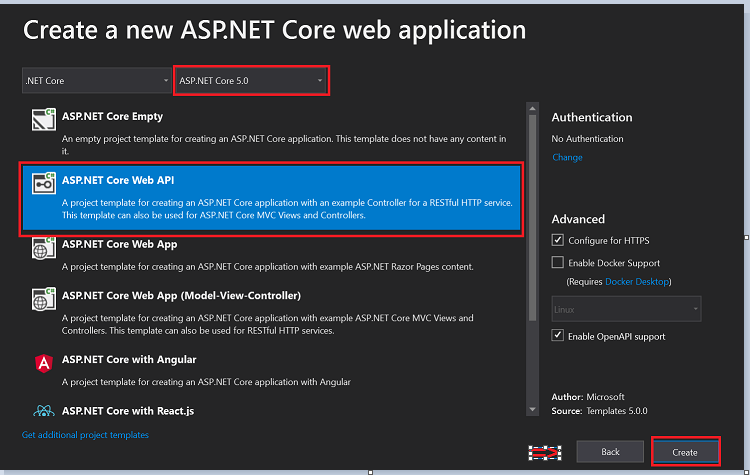
Create and set up project template with .Net 5
In order to configure Hangfire, we need to install hangfire related packages. Below are the 4 packages that help in configuration and setup authentication and to store job-related information in SQL.
In this project, I have used Data insertion to Database using background tasks - Hangfire and the Code first approach.
Models
Employee.cs
using System;
using System.Collections.Generic;
using System.ComponentModel.DataAnnotations;
using System.Linq;
using System.Threading.Tasks;

namespace Hangfire.Model
{
 public class Employee
    {
        [Key]
 public int Id { get; set; }
 public string EmployeeName { get; set; }
 public string Designation { get; set; }
    }
}
AppDbContext
EmployeeDbContext.cs
using Hangfire.Model;
using Microsoft.EntityFrameworkCore;
using System;
using System.Collections.Generic;
using System.Linq;
using System.Threading.Tasks;

namespace Hangfire.AppDbContext
{
 public partial class EmployeeDbContext : DbContext
    {
 public EmployeeDbContext(DbContextOptions options) : base(options)
        {

        }
 public DbSet<Employee> Employees { get; set; }
    }
}
appsettings.js
"ConnectionStrings": {
 "myconn": "server=N-20RJPF2CFK06\\SQLEXPRESS; database=Temp;Trusted_Connection=True;"
  },
Configure the connection string and Hangfire and services injection in the startup file. Startup.cs
using Hangfire.AppDbContext;
using Hangfire.Services;
using HangfireBasicAuthenticationFilter;
using Microsoft.AspNetCore.Builder;
using Microsoft.AspNetCore.Hosting;
using Microsoft.AspNetCore.HttpsPolicy;
using Microsoft.AspNetCore.Mvc;
using Microsoft.EntityFrameworkCore;
using Microsoft.Extensions.Configuration;
using Microsoft.Extensions.DependencyInjection;
using Microsoft.Extensions.Hosting;
using Microsoft.Extensions.Logging;
using Microsoft.OpenApi.Models;
using System;
using System.Collections.Generic;
using System.Linq;
using System.Threading.Tasks;

namespace Hangfire
{
 public class Startup
    {
 private static IEmployeeService employeeService;
 private readonly Job jobscheduler = new Job(employeeService);
 public Startup(IConfiguration configuration)
        {
            Configuration = configuration;
        }

 public IConfiguration Configuration { get; }

 // This method gets called by the runtime. Use this method to add services to the container.
 public void ConfigureServices(IServiceCollection services)
        {

            services.AddControllers();
            services.AddSwaggerGen(c =>
            {
                c.SwaggerDoc("v1", new OpenApiInfo { Title = "Hangfire", Version = "v1" });
            });

            #region Configure Connection String
            services.AddDbContext<EmployeeDbContext>(item => item.UseSqlServer(Configuration.GetConnectionString("myconn")));
            #endregion

            #region Configure Hangfire
            services.AddHangfire(c => c.UseSqlServerStorage(Configuration.GetConnectionString("myconn")));
            GlobalConfiguration.Configuration.UseSqlServerStorage(Configuration.GetConnectionString("myconn")).WithJobExpirationTimeout(TimeSpan.FromDays(7));
            #endregion

            #region Services Injection
            services.AddTransient<IEmployeeService, EmployeeService>();
            #endregion
        }

 // This method gets called by the runtime. Use this method to configure the HTTP request pipeline.
 public void Configure(IApplicationBuilder app, IWebHostEnvironment env,IBackgroundJobClient backgroundJobClient, IRecurringJobManager recurringJobManager)
        {
 if (env.IsDevelopment())
            {
                app.UseDeveloperExceptionPage();
                app.UseSwagger();
                app.UseSwaggerUI(c => c.SwaggerEndpoint("/swagger/v1/swagger.json", "Hangfire v1"));
            }

            #region Configure Hangfire
            app.UseHangfireServer();

 //Basic Authentication added to access the Hangfire Dashboard
            app.UseHangfireDashboard("/hangfire", new DashboardOptions()
            {
                AppPath = null,
                DashboardTitle = "Hangfire Dashboard",
                Authorization = new[]{
 new HangfireCustomBasicAuthenticationFilter{
                    User = Configuration.GetSection("HangfireCredentials:UserName").Value,
                    Pass = Configuration.GetSection("HangfireCredentials:Password").Value
                }
            },
 //Authorization = new[] { new DashboardNoAuthorizationFilter() },
 //IgnoreAntiforgeryToken = true
            }); ;
            #endregion

            app.UseHttpsRedirection();

            app.UseRouting();

            app.UseAuthorization();

            app.UseEndpoints(endpoints =>
            {
                endpoints.MapControllers();
            });

            #region Job Scheduling Tasks
 //recurringJobManager.AddOrUpdate("Insert Employee : Runs Every 1 Min", () => jobscheduler.JobAsync(), "*/1 * * * *");
            #endregion
        }
    }
}
Then we have to create the table using the below migration commands in the package manager console.
Creates migration folder and migration script inside the target project.
PM> Add-Migration 'MigrationName' The next command executes the migration script and creates a table in the database
PM> Update-Database Services
EmployeeService.cs
using Hangfire.AppDbContext;
using Hangfire.Model;
using System;
using System.Collections.Generic;
using System.Linq;
using System.Threading.Tasks;

namespace Hangfire.Services
{
 public class EmployeeService : IEmployeeService
    {
        #region Property
 private readonly EmployeeDbContext _employeeDbContext;
        #endregion

        #region Constructor
 public EmployeeService(EmployeeDbContext employeeDbContext)
        {
            _employeeDbContext = employeeDbContext;
        }
        #endregion

        #region Insert Employee
 public async Task<bool> InsertEmployeeAsync()
        {
 try
            {
                Employee employee = new Employee()
                {
                    EmployeeName = "Jk",
                    Designation = "Full Stack Developer"
                };
                await _employeeDbContext.AddAsync(employee);
                await _employeeDbContext.SaveChangesAsync();
 return true;
            }
 catch (Exception ex)
            {
 throw;
            }
        }
        #endregion
    }
}
IEmployeeService.cs
using System;
using System.Collections.Generic;
using System.Linq;
using System.Threading.Tasks;

namespace Hangfire.Services
{
 public interface IEmployeeService
    {
        Task<bool> InsertEmployeeAsync();
    }
}
The Service Injection is already done in the Startup. cs file
services.AddTransient<IEmployeeService, EmployeeService>(); Secure the Hangfire Dashboard
To Secure the hangfire dashboard we setup login authentication in order to access the hangfire dashboard. I have hardcoded the username and password in the appsettings.js file to consume those in the startup.cs
appsettings.js
"HangfireCredentials": {
 "UserName": "admin",
 "Password": "admin@123"
  }
Starup.cs
//Basic Authentication added to access the Hangfire Dashboard
            app.UseHangfireDashboard("/hangfire", new DashboardOptions()
            {
                AppPath = null,
                DashboardTitle = "Hangfire Dashboard",
                Authorization = new[]{
 new HangfireCustomBasicAuthenticationFilter{
                    User = Configuration.GetSection("HangfireCredentials:UserName").Value,
                    Pass = Configuration.GetSection("HangfireCredentials:Password").Value
                }
            },
            }); ;
Hangfire Retention Time
Usually, the hangfire jobs running in the background will elapse for 24 hours. To avoid this I have to enable the basic setting to last this job in the dashboard for at least 1 week.
Startup.cs
GlobalConfiguration.Configuration.UseSqlServerStorage(Configuration.GetConnectionString("myconn")).WithJobExpirationTimeout(TimeSpan.FromDays(7)); Persistence with SQL Database
Hangfire has an option to store all the job-related information in the database. For this we don't need anything we have to configure this setup in the Startup.cs and it automatically creates all the tables where we can see the job status and respective information in those tables.
Startup.cs
services.AddHangfire(c => c.UseSqlServerStorage(Configuration.GetConnectionString("myconn"))); The above set of tables were created automatically when we configured the setup and point to the database.
Create background tasks
Job.cs
using Hangfire.Services;
using System;
using System.Collections.Generic;
using System.Linq;
using System.Threading.Tasks;

namespace Hangfire
{
 public class Job
    {
        #region Property
 private readonly IEmployeeService _employeeService;
        #endregion

        #region Constructor
 public Job(IEmployeeService employeeService)
        {
            _employeeService = employeeService;
        }
        #endregion

        #region Job Scheduler
 public async Task<bool> JobAsync()
        {
            var result = await _employeeService.InsertEmployeeAsync();
 return true;
        }
        #endregion
    }
}
There are 4 types of jobs that mostly we will use. I have created all 4 jobs in a startup.cs file.
Starup.cs
#region Job Scheduling Tasks
 // Recurring Job for every 5 min
            recurringJobManager.AddOrUpdate("Insert Employee : Runs Every 1 Min", () => jobscheduler.JobAsync(), "*/5 * * * *");

 //Fire and forget job
            var jobId =  backgroundJobClient.Enqueue(() => jobscheduler.JobAsync());

 //Continous Job
            backgroundJobClient.ContinueJobWith(jobId, () => jobscheduler.JobAsync());

 //Schedule Job / Delayed Job

            backgroundJobClient.Schedule(() => jobscheduler.JobAsync(), TimeSpan.FromDays(5));
            #endregion
Recurring job - Every 5 minutes the background task runs and inserts data into database.
Fire and Forget - This job runs only once when we run the application.
Continuous Job - When we want to run jobs one after another at that time this will be useful so that it will execute one by one.
Schedule Job - If you want to schedule a task to run at a particular time.
Run the application
By default, the swagger endpoint will open. Now type hangfire in the URL by removing the swagger. It will ask for a username and password as we had already set up the authentication mechanism .
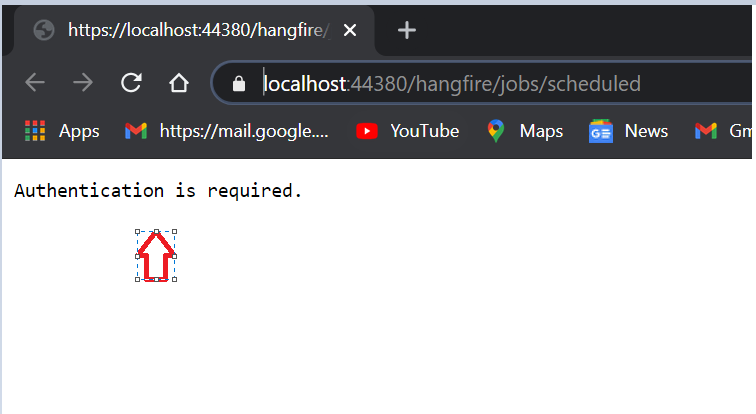
If you try to access without login.
If you click on jobs and succeed then we will see the job execution status and its time, and also we can see the historical graph in the dashboard as well.
We can see our scheduled jobs and recurring jobs in the tab and menu and also we have an option to delete the particular job that you no longer want to see.
Source: C# Corner


Commenti