Create a web socket server in .NET
- The Tech Platform
- Aug 8, 2022
- 4 min read

Creating a web socket (WS) server in C# can be a drag these days. There are several methods you can find online, and there does not seem to be a universal solution.
Project setup
Let’s begin. First, create an ASP .NET Core MVC project.

Project structure
Web socket configuration and handling happens in the Program.cs file. Aside from that, most of the client-server communication will be in a separate class.
Receive web socket requests
app.UseWebSockets();
app.Use(async (context, next) =>
{
    if (context.WebSockets.IsWebSocketRequest)
    {
        // Here we will handle the web socket request
    }
    else
    {
        // Handle other requests normally
        await next(context);
    }
});
Enable web sockets
Inside the Program.cs file, enable web sockets with app.UseWebSockets();
Define middleware that detects and handles web socket requests with the app.Use(...); method.
Note: put these two methods before the app.MapControllerRoute(); method call.
Create a handler
Create a class that handles web socket requests in a separate folder named Core. Name the class WebSocketHandler.
Create a method called HadleWebSocket that receives HTTP context.
namespace WebSocket.Core
{
    public class WebSocketHandler
    {
        public static async Task HandleWebSocket(HttpContext context)
        {
            // Handle web socket
        }
    }
}
Create WebSocketHandler class
Now, call the method in Program.cs.
Since the method is asynchronous, await it to keep the client-server connection alive.
app.UseWebSockets();
app.Use(async (context, next) =>
{
    if (context.WebSockets.IsWebSocketRequest)
    {
        // Here we will handle the web socket request
        await WebSocket.Core.WebSocketHandler
                    .HandleWebSocket(context);
    }
    else
    {
        // Handle other requests normally
        awaitnext(context);
    }
});
Use the handler class
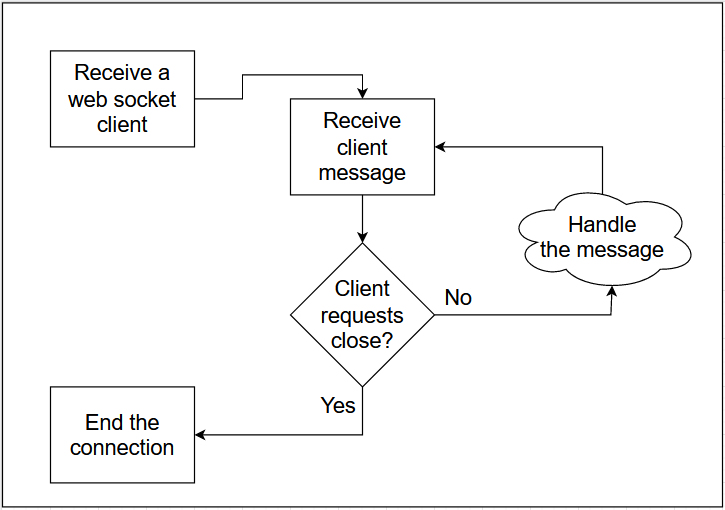
Client — Server communication diagram

Web socket server-client diagram
WS client-server implementation follows these steps:
Initialize the connection: extract useful data from HttpContext and initialize various containers.
Read messages in a loop: read client message into a buffer
Handle messages: check if client message is textual
Close the connection: if client message is a ‘close’ command, terminate the connection
1. Initialize the connection
Inside the HandleWebSocket method, extract the web socket from the HTTP context. You may also extract other parameters from the context.
Let’s think about this example. A client may connect to our server on the following url: wss://my-awesome-page.com/admin/?token=1234.
On the server, you may easily extract the /admin request route and the token parameter.
public static async Task HandleWebSocket(HttpContext context)
{
    // Get the underlying socket
    using var socket = await context.WebSockets.AcceptWebSocketAsync();

    // 1. Extract useful information from HttpContext
    string requestRoute = context.Request.Path.ToString();
    string token = context.Request.Query["token"];
}
Extract data from HTTP context
2. Read messages in a loop
Now comes the core of web socket handling. Here you will create buffer of type byte and a while loop that will run until the connection is alive.
Create a few variables: - connectionAlive for the while loop - webSocketPayload byte buffer - tempMessage buffer.
// HandleWebSocket

// Initialize containers for reading
bool connectionAlive = true;
List<byte> webSocketPayload = new List<byte>(1024 * 4);
// 4 KB initial capacity

byte[] tempMessage = new byte[1024 * 4];
// Message reader

// 2. Connection loop
while (connectionAlive)
{
    // Empty the container
    webSocketPayload.Clear();

    // Message handler
    WebSocketReceiveResult? webSocketResponse;

      // Read message in a loop until fully read
      do
      {
          // Wait until client sends message
          webSocketResponse = await socket.ReceiveAsync(tempMessage, CancellationToken.None);

          // Save bytes
          webSocketPayload.AddRange(new ArraySegment<byte>(tempMessage, 0, webSocketResponse.Count));
      }
      while (webSocketResponse.EndOfMessage == false);

      // ...
  }
Web socket message handling
The reason for having two buffers is that client may send a single message in several chunks. To read all chunks, create a do…while loop that continually reads the chunks until the entire message is read.
Use WebSocketReceiveResult for it.
Before the do…while loop, clear previous messages from the buffer.
3. Handle messages
Create a condition that detects textual messages from the client. Convert the message to a string and log it to the console.
while (connectionAlive)
{
    // Empty the container
    webSocketPayload.Clear();

    // Message handler
    WebSocketReceiveResult? webSocketResponse;

    // do...while loop

    // Process the message
    if (webSocketResponse.MessageType==WebSocketMessageType.Text)
    {
        // 3. Convert textual message from bytes to string
        string message = System.Text.Encoding.UTF8.GetString(webSocketPayload.ToArray());

        Console.WriteLine("Client says {0}", message);
    }
}
Read textual messages
4. Close the connection
The client may request that the server closes the connection.
Create another condition for that case. In it, set the connectionAlive value to ‘false’ to terminate the while loop.
while (connectionAlive)
{
    // Empty the container
     webSocketPayload.Clear();

     // Message handler
     WebSocketReceiveResult? webSocketResponse;

     // do...while loop

     // Process the message
     if (webSocketResponse.MessageType == WebSocketMessageType.Text)
     {
         // ...
     }
     else if (webSocketResponse.MessageType == WebSocketMessageType.Close)
     {
         // 4. Close the connection
         connectionAlive = false;
     }
 }
Terminate the connection
Client HTML
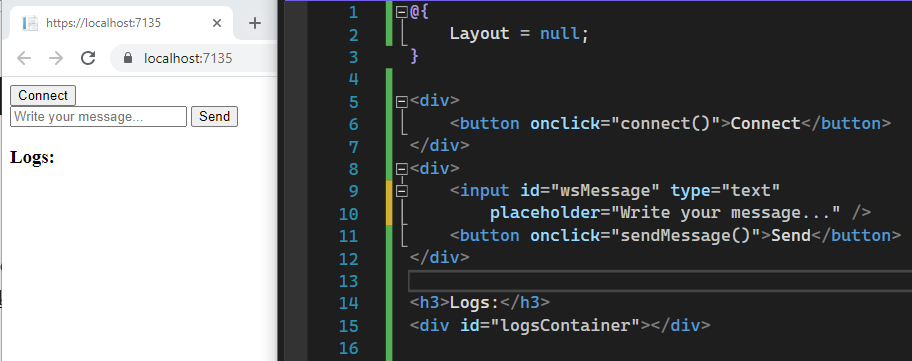
Having created the core server functionality, create a basic client HTML. Use the JS Web Sockets API.
Page /Views/Home/Index.cshtml:

Web socket client HTML
To avoid using the layout page, set Layout = null;
Write JS code in the same file:
<script>
    var socket = null;

    function connect()
    {
        var url = 'wss://' + location.host;
        socket = new WebSocket(url);

        socket.addEventListener('open', function(event)
        {
            addLog('Connected to ' + url);
        });
        socket.addEventListener('message', function(event)
        {
            addLog('Message from server: ' + event.data);
        });
    }

    function sendMessage()
    {
        var message = wsMessage.value;
        socket.send(message);
        addLog('Message sent!');
    }

    function addLog(log)
    {
        var logParagraph = document.createElement('p');
        logParagraph.innerText = log;
        logsContainer.appendChild(logParagraph);
    }
</script>
Web socket client JS
In the JS code, you have created a basic client-side web socket handler. Function connect initializes the socket, sendMessage sends data to the server and addLog visually shows events as they happen.
Some server setup
Now that you have both the client and the server code, only thing left to do is to put some logs:
public static async Task HandleWebSocket(HttpContext context)
{
    // From here we will handle the web socket request
    using var socket = await context.WebSockets.AcceptWebSocketAsync();

    Console.WriteLine(" -> A new client connected!");

    // ...

    while (connectionAlive)
    {
        // ...

        if (webSocketResponse.MessageType == WebSocketMessageType.Text)
        {
            // 3. Convert textual message from bytes to string
            string message = System.Text.Encoding.UTF8.GetString(webSocketPayload.ToArray());

            Console.WriteLine("Client says {0}", message);
        }
        // ...
    }
    Console.WriteLine(" -> A client disconnected.");
}
Log server events to the console
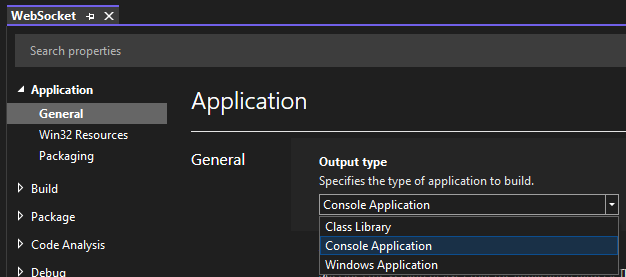
Lastly, turn on the console in the project properties:

Enable the console in the app properties
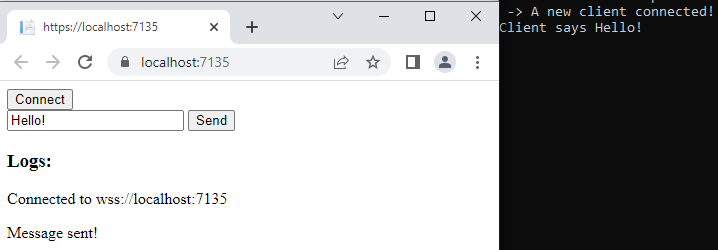
Demo

Client-server communication
To check whether you have correctly created the server, start the app in the debugging mode. Afterwards, connect to the server and send a message.
Source: Medium - Stjepan
The Tech Platform

Comentários