In this article you will be seeing how to create Social Comments for any specified URL in SharePoint 2010 using Powershell.
Automation: Create Social Comments in SharePoint 2010 using PowerShell
Social Comments can be created for any specified URL. SocialCommentManager object is used to create Social Comment for any specified URL.
Steps Involved:
Create the input xml file which contains the inputs for creating social comments.
Create ps1 file which contains the script for creating social comments.
CreateSocialComment.xml
<?xml version="1.0" encoding="utf-8" ?>
<SocialComment>
<SiteURL> https://serverName.com/Finance/Finance/</SiteURL>
<Uri>https://serverName.com/Finance/Finance/</Uri>
<Comment>My Comment</Comment>
<Title>Comments</Title>
</SocialComment>
CreateSocialComment.ps1
## ------------------------------------------------------------------- ## Powershell script for creating Social Comment ## Note : Need to update the XML file path before running the script. ## Author : Vijai Anand Ramalingam ## Date : 31-Oct-2011 ## -------------------------------------------------------------------
#----------------Get the xml file---------------------------------------------------------------
[xml]$xmlData=Get-Content "D:\VijaiPOC\CreateSocialComment.xml"
#----------------Create Social Comment function----------------------------------------------------
function CreateSocialComment() { $uri = New-Object System.Uri($xmlData.SocialComment.Uri) $site = Get-SPSite $xmlData.SocialComment.SiteURL $comment = $xmlData.SocialComment.Comment $title = $xmlData.SocialComment.Title
## Get the context of the service application $context = Get-SPServiceContext($site)
## SocialCommentManager – used to create the Social Comment for any specified URL $socialCommentManager = New-Object -TypeNameMicrosoft.Office.Server.SocialData.SocialCommentManager -ArgumentList $context
## Methods used to add social comments ## AddComment(Uri, String) – used to add the social comment for the specified URL ## AddComment(Uri, String, Boolean) – used to add the social comment for the specified URL and gives the comment the specified priority ## AddComment(Uri, String, Boolean, String) – used to add the social comment for the specified URL and gives the comment the specified priority and title
$socialCommentManager.AddComment($uri, $comment,$true $title);
## Dispose the site object $site.Dispose() }
#----------------Calling the function------------------------------------------------------------
CreateSocialComment
Run the Script:
Go to Start.
Click on All Programs.
Click on Microsoft SharePoint 2010 Products and then click on SharePoint 2010 Management Shell (run as Administrator).
Run the D:\VijaiPOC\CreateSocialComment.ps1
Newly created social comment:
Open Central Administration by going Start | All Programs | Microsoft SharePoint 2010 Products | SharePoint 2010 Central Administration.
Click on Manage Service Application which is available in Application Management section.
Figure : Application Management section in SharePoint 2010
Click on User Profile Service Application.
Click on Manage Social Tags and Notes which is available in "My Site Settings" section.
Select Notes from the Type dropdown and enter the URL and Tag/Note contains value.
Click on Find.
You could be able to see the Social Comment that we have created using Powershell.
Alternate way: Navigate to the URL for which you have created the social comment.
In the ribbon interface, click on Tags & Notes button.
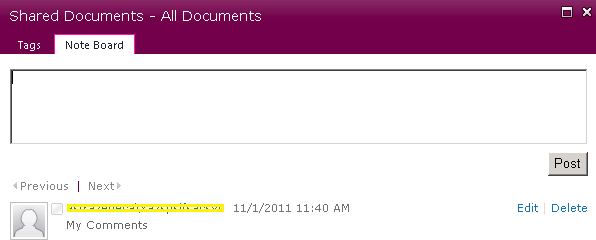
Click on Note Board tab and you could see the social comment that you have created as shown in the following figure.
Summary:
Thus in this article you have seen how to create social comments using powershell in SharePoint 2010.


Comments