This post will cover how to connect PowerShell to Office 365 (Azure Active Directory (Azure AD)), which manages Microsoft 365 tenant identities and licenses. I will also cover connecting to other services and products in Microsoft 365, such as Exchange, SharePoint, and Microsoft Teams.
Before Connecting
How to Connect Powershell to Microsoft 365
How to Connect Powershell to Other 365 Platforms
Multi-Factor Authentication
Reasons to Connect Powershell
If you have worked with Microsoft technologies in the last decade, you know that PowerShell is the preferred language for managing and configuring many Microsoft products. There are multiple reasons to use PowerShell to manage Microsoft 365:
Automation for Productivity: You can perform bulk operations using PowerShell, such as assigning licenses or configuring mailbox settings.
Settings Only Configurable with PowerShell: Microsoft can’t put every setting in the admin center, so PowerShell is sometimes the only way to make a configuration change. For examples of settings only configurable through PowerShell, check out 7 Hidden Office 365 Settings You Can Unlock with PowerShell by Vlad Catrinescu.
Filtering Data: PowerShell can filter data and provide relevant results, such as mailbox type or a user’s assigned location.
Exporting Data: Just as PowerShell can gather and filter data, you can also use it to export data. The most common option is exporting to a CSV file, but you can also format the data into JSON or XML.
Management Across Products: Each service has its own set of PowerShell management capabilities. PowerShell can perform operations in each service for onboarding new user accounts or compiling a report of information involving multiple services.
Standardization: You can write a script or function in PowerShell to standardize a task, such as creating a new user account or setting up a new SharePoint site. By making the task repeatable, you ensure that the process follows specific procedures each time, which can be missed if performed manually in the admin center.
Before Connecting to Azure AD Powershell
You need to meet some prerequisites before connecting out to Azure AD using PowerShell. First, you need an account with sufficient privileges to connect. The Global Administrator will have access to the most management features and data across the services. However, Microsoft recommends you only have 2-4 Global Administrators in your tenant. In this case, you should assign the least permissive role needed for administrators to perform their job functions. Other roles include Global Reader, Groups Admin, and Helpdesk Admin.
There are two different modules that can manage Azure AD for Microsoft 365:
Azure Active Directory Module for Windows PowerShell
1. Version 1 of the module for Azure Active Directory
2. Also known as MSOnline module
3. Cmdlets include Msol in their name
Azure Active Directory PowerShell for Graph module
1. Version 2 of the module for Azure Active Directory
2. Cmdlets include AzureAD in their name
The version 2 Graph module doesn’t completely replace the functionality found in version 1 of the Windows PowerShell module. In general, you should try to use the Graph module; however, you may run into cases where you need to use the older Windows PowerShell module.
Both modules have the following requirements and can be installed independently of each other on the same system:
Operating System Version: You can use multiple versions of Windows to connect:
1. Windows 7 SP1, Windows 8, Windows 8.1, and Windows 10
2. Windows Server 2008 R2 SP1, Windows Server 2012, Windows Server 2012 R2, Windows
Server 2016, and Windows Server 2019
Operating System Architecture: You must use a 64-bit version of Windows.
PowerShell Core and version 7 and higher do not support the Microsoft Azure Active Directory Module for Windows PowerShell. If you are using PowerShell version 7 and later, you will need to use the Azure Active Directory PowerShell for Graph module. The Microsoft Azure Active Directory Module for Windows PowerShell also requires installing the Microsoft Online Services Sign-In Assistant for IT Professionals RTW if you are not using Windows 10.
Next, we need to install each module from the PowerShell Gallery. The PowerShell Gallery is a repository that hosts many Microsoft PowerShell modules. The PowerShell Gallery enables users to quickly and easily install and update modules directly from PowerShell. Modules are installed by their module name using the Install-Module cmdlet.
To install the Azure Active Directory Module for Windows PowerShell, run the following PowerShell command:
Install-Module -Name MSOnlineTo install the Azure Active Directory PowerShell for Graph module, run the following PowerShell command:
Install-Module -Name AzureADIf you receive a message about installing from an untrusted repository, ensure that it refers to the PSGallery repository, then enter Y.
If you want to suppress this message in the future, you can run the following PowerShell command to set the PSGallery as a trusted installation location:
Set-PSRepository -Name PSGallery -InstallationPolicy TrustedHow to Connect Powershell to Microsoft 365
Each module has different commands for connecting out to Azure Active Directory. You can also save your account credentials to create a PowerShell session much quicker.
1. Create a PSCredential Object
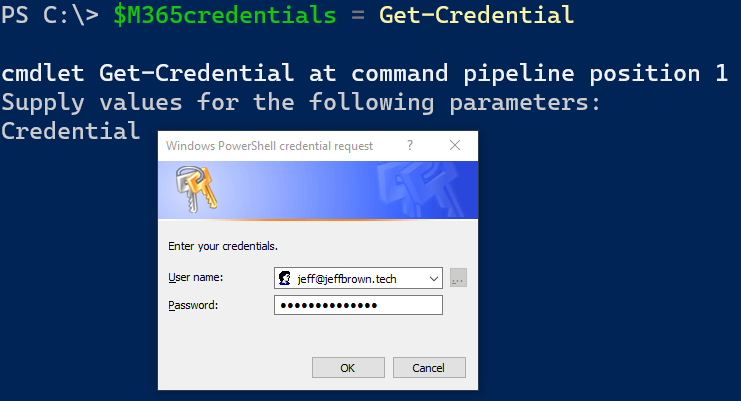
A PSCredential object stores a username and password that you can use to authenticate to different services. To create a PSCredential object to a variable, use the Get-Credential cmdlet, and a window will prompt you for the administrator username and password. Saving the credentials to a variable allows for easy reuse with multiple connection cmdlets.
Get-Credential2. Connect to MSOnline Service
To connect to the Azure Active Directory Module for Windows PowerShell or MSOnline module, use the Connect-MsolService cmdlet and supply the $M365credentials variable.
Connect-MsolService -Credential $M365credentials3. Connect to AzureAD Service
To connect to the Azure Active Directory PowerShell for Graph module, use the Connect-AzureAD cmdlet, again using the $M365credentials variable with the stored username and password.
Connect-AzureAD -Credential $M365credentials4. Verify Your Connection
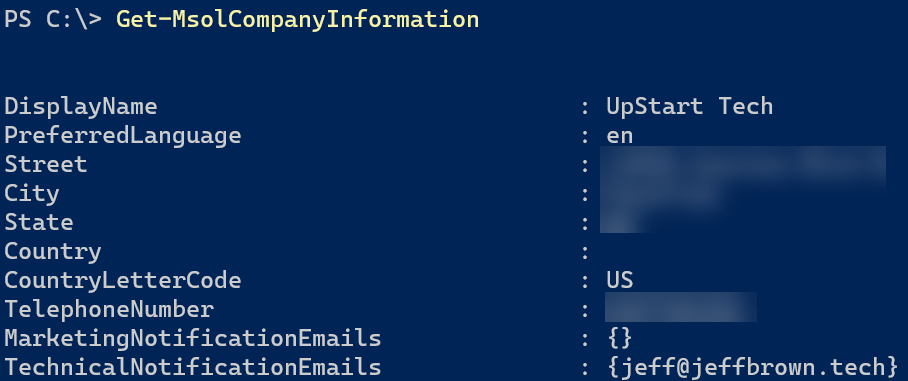
If PowerShell makes a successful connection using the MSOnline module, the window will not show anything. However, you can run the Get-MsolCompanyInformation cmdlet to verify you are connected to the correct Azure AD tenant.
Get-MsolCompanyInformationIf PowerShell makes a successful connection using the AzureAD module, the window will display the connecting account, the environment, the tenant ID, and the tenant domain.
How to Connect Powershell to Other 365 Platforms
Connecting PowerShell out to Azure AD is only the beginning. While you can manage tenant and user settings, Azure AD does not have access to other services hosted in Microsoft 365. The other cloud products all have their way of connecting to PowerShell with their modules and connect cmdlets. The following sections show how to connect to the primary services in Microsoft 365.
Connect to Exchange Online
To connect to Exchange Online, you previously had to create a remote PowerShell session and import it. However, Microsoft has improved on this process by releasing a module with its own connect cmdlet. The new ExchangeOnlineManagement module (found here in the PowerShell Gallery) has all the same cmdlets found in version 1 of remote PowerShell but includes new cmdlets that improve performance for working with mailboxes and other recipient objects.
To use this new module, you need to install it from the PowerShell Gallery using the Install-Module cmdlet as you did with the Azure AD modules. You then use the Connect-ExchangeOnline cmdlet with your credential variable to make the PowerShell connection.
Install-Module -Name ExchangeOnlineManagement

Connect-ExchangeOnline -Credential $M365credentials
Connect to Security and Compliance Center
You can create compliance cases, search the admin audit log, and create retention policies using PowerShell with the security and compliance center. With the release of the new ExchangeOnlineManagement module mentioned in the previous section, you can connect to the security and compliance center using Connect-IPPSSession and your credential object. You can then run a command like Get-AdminAuditLogConfig to verify a successful connection.
Connect-IPPSSession -Credential $M365CredentialIf you are connecting to an Office 365 Germany tenant, you will need to specify the -ConnectionUri parameter with a value of “https://ps.compliance.protection.outlook.de/PowerShell-LiveID”. You can find more information about special circumstances in the Connect-IPPSSession document.
Connect to SharePoint Online
SharePoint Online also has its module for connecting a PowerShell session. You can get the SharePoint Online Management Shell module by downloading and installing the executable from Microsoft’s site. You can also install the SharePoint Online Management Shell from the PowerShell Gallery using the Install-Module command.
To connect PowerShell to SharePoint Online, you use the Connect-SPOService cmdlet and continue to use the credential object. You also need to specify the tenant admin SharePoint URL. The URL contains your tenant name (the same name found in your .onmicrosoft.com domain), followed by “-admin.sharepoint.com”. In this example, my tenant name is “upstarttech”.
Install-Module -Name Microsoft.Online.SharePoint.PowerShell

$orgName = “upstarttech”

Connect-SPOService -Url “https://$orgName-admin.sharepoint.com” -Credential $M365Credentials
If you received an error message that the web site does not support SharePoint Online credentials, you could try to connect again without specifying the -Credential parameter. PowerShell will prompt you for the username and password.
Once connected, verify some tenant configuration settings using the following command:
Get-SPOTenant | Select-Object LegacyAuthProtocolsEnabled, RequireAcceptingAccountMatchInvitedAccountTo use a PSCredential object, LegacyAuthProtocolsEnabled should be “true”, and RequireAcceptingAccountMatchInvitedAcount should be “false”. If you change these values, verify any security or third-party integrations that might be affected. The change can also take some time to take effect.
Connect to Microsoft Teams
Microsoft Teams is rapidly increasing in popularity within the Microsoft 365 service. Like the other modules, Microsoft hosts a module for it out in the PowerShell Gallery.
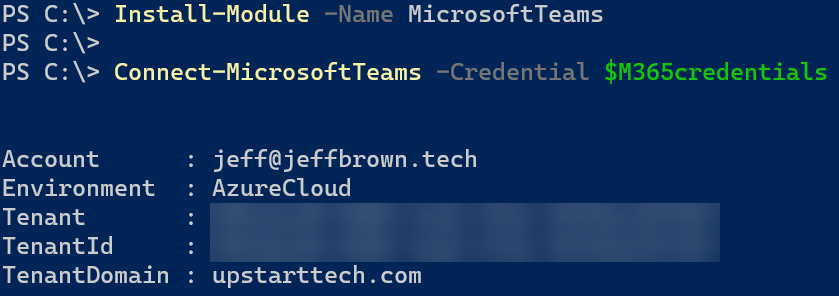
To install this module, you can use the Install-Module cmdlet again and specify the MicrosoftTeams module. You then use the Connect-MicrosoftTeams cmdlet to connect to the online service using our saved PSCredential variable. A successful connection will output information about the Microsoft Teams tenant.
Install-Module -Name MicrosoftTeams

Connect-MicrosoftTeams -Credential $M365credentials
Connect to Skype for Business Online
Skype for Business Online previously required downloading and installing the module manually from Microsoft’s download center. Recently, Microsoft incorporated the New-CsOnlineSession cmdlet directly into the MicrosoftTeams module that you installed in the previous section. While Microsoft is retiring Skype for Business Online in July 2021, many Microsoft Teams settings and policy administration still occur in the Skype for Business Online service.
To connect to the Skype for Business Online service in PowerShell, you need to save a remote PowerShell session to a variable using the New-CsOnlineSession cmdlet, then import the session. If the connection is successful, PowerShell will display the temporary module that contains all the Skype for Business Online cmdlets.
$skypeSession = New-CsOnlineSession -Credential $M365credentials

Import-PSSession -Session $skypeSession
Multi-Factor Authentication
Multi-factor authentication is an additional security mechanism that requires another form of authentication beyond your account password. Multi-factor authentication can come from push notifications from a mobile app, hardware tokens, or codes received via SMS messages.
At a minimum, administrator accounts should have multi-factor authentication enabled as these are elevated accounts that require extra security. Today, more organizations enable multi-factor authentication to secure regular user accounts to protect from stolen credentials.
How To Use MFA with Office 365 and PowerShell
If your administrator account has multi-factor authentication enabled, you will not use stored credentials as I did in the previous examples. The session needs to authenticate using an interactive OAuth window that prompts for the secondary verification.
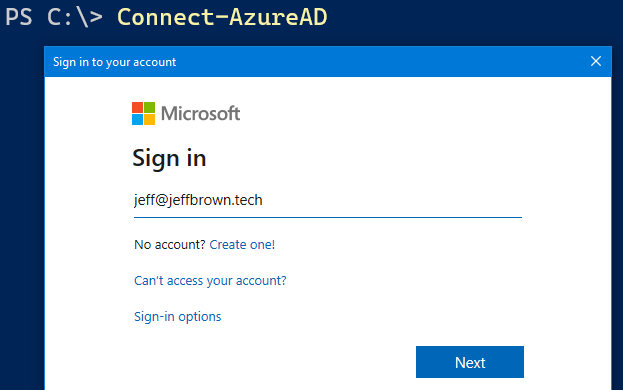
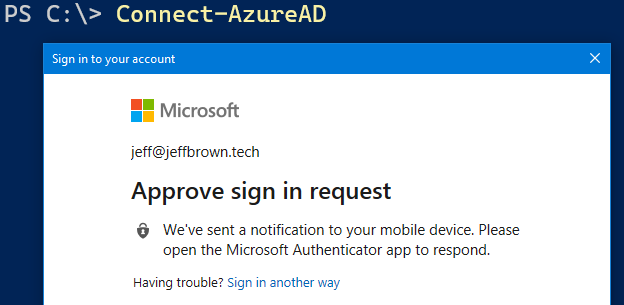
Let’s go back to connecting to the AzureAD graph module with an account with multi-factor authentication. I’m going to rerun the Connect-AzureAD without specifying a credential object. It will prompt you for the username and password, then wait for me to complete the second factor from my Microsoft Authenticator mobile app.
Prompting for username and password:
The authentication process then asks me to verify using a second form of authentication by approving the authentication attempt:
How To Set an App Password for Microsoft 365 and PowerShell
While adding multi-factor authentication adds another layer of security, this can be a problem if you need a PowerShell script to run without interaction. You want to add the additional protection but cannot complete the second-factor authentication all the time.
To solve this, you can create an app password. App passwords allow replacing your regular account password and will enable an app to bypass multi-factor authentication. Applications that don’t support multi-factor authentication can use app passwords.
To configure an app password:
Navigate to https://aka.ms/mfasetup and select the App Passwords menu.
Select the Create button and give the app password a name to indicate its purpose.
After clicking Next, the window will display the app password, and you should save it in a password credential manager as you won’t be able to retrieve it.
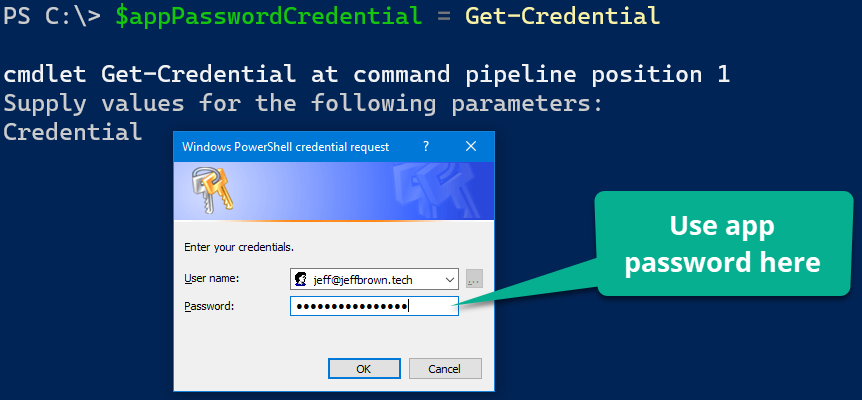
With my new app password, I can create a new PSCredential object. Instead of storing my regular account password, I will use the app password. With the new PSCredential variable created, I will use it to make my connection.
Summary
Mastering PowerShell can take your administrator skills to the next level and learning how to connect to Office 365 PowerShell is just one of the first steps. You can quickly make changes in the different services or perform tenant administration not found in the admin center. See some additional foundational PowerShell scripting tutorials to build up your skills.
Source: varonis
The Tech Platform












Commentaires