
Self-signed SSL certificates in Windows 10 can be used for testing purposes, or for secure internal communication within a private network. Self-signed certificates are not trusted by default by web browsers, which means that users will be presented with a warning when they visit a website using a self-signed certificate. However, you can manually trust the certificate on each device or within a closed network.
This article will guide you to create Seld-signed SSL Certificates in Windows 10.
Create Self-signed SSL Certificates in Windows 10
STEP 1: Open a PowerShell window with admin privileges.
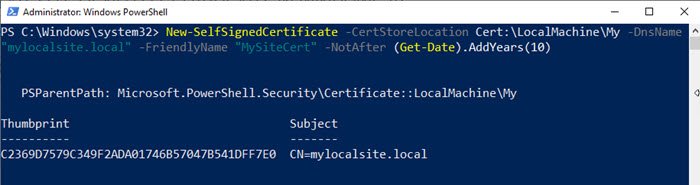
STEP 2: Execute the following command. Make sure to set the exact site name you plan to use on the local computer,
New-SelfSignedCertificate -CertStoreLocation Cert:\LocalMachine\My -DnsName "mylocalsite.local" -FriendlyName "MyLocalSiteCert" -NotAfter (Get-Date).AddYears(10)If you want to test all the original certificate parameters, you can use the CloneCert parameter —more on the official document.
How to apply or install the certificate on the local website on the computer
Once you have the certificate, you will need to install the computer certificate so browsers can find it. You will need to copy it to the Trusted Root Certification Authorities store.
STEP 1: Open the Microsoft Management Console (mmc.exe) by typing "mmc.exe" in the search bar and hitting Enter.
STEP 2: From the File menu, select Add/Remove Snap-in.

STEP 3: Select the Certificates snap-in, then click the Add button.

STEP 4: Select Computer account, then click Next.

STEP 5: Select Local computer, then click Finish.

STEP 6: Close the Add or Remove Snap-ins window.


STEP 7: Navigate to Certificates – Local Computer > Personal > Certificates. This place stores all the local certificate that is created on the computer.
STEP 8: Find the certificate you have created.
STEP 9: Next, on the left panel, expand Trusted Root Certification Authorities > Certificates.
STEP 10: Drag and drop the local certificate and drop into this folder
STEP 11: You can also copy and paste it.


Once done, make sure to access the local site with HTTPS instead of HTTP. You may have to make the changes to the webserver so any time the local site is accessed, it redirects to the secured version.
Comments