
PostgreSQL is an advanced, enterprise class open source relational database that supports both SQL (relational) and JSON (non-relational) querying. It is a highly stable database management system, backed by more than 20 years of community development which has contributed to its high levels of resilience, integrity, and correctness. PostgreSQL is used as the primary data store or data warehouse for many web, mobile, geospatial, and analytics applications.
To use Postgre in your machine, you need to install:
Postgre Database Server
A graphical tool to administer and manage the DB. pgAdmin is the most popular tool GUI Tool for Postgre
You could individually Download PostgreSQL for Windows and install these components but coupling the settings between the DB server, and a GUI tool could be a challenge. It’s best to use a bundled installer which takes care of configuration complexities.
Install PostgreSQL on Windows Machine:
Step 1) Go to https://www.postgresql.org/download and select Windows

Step 2) You are given two options
Interactive Installer by EnterpriseDB
Graphical Installer by BigSQL
BigSQL currently installs pgAdmin version 3 which is deprecated. It’s best to choose EnterpriseDB which installs the latest version 4

Step 3)
You will be prompted to desired PostgreSQL version and operating system. Select the latest PostgreSQL version and OS as per your environment
Click the Download Button

Download will begin

Step 4)Once you Download PostgreSQL, open the downloaded exe and Click next on the install welcome screen.

Step 5)
Change the Installation directory if required, else leave it to default
Click Next

Step 6)
You may choose the components you want to install in your system. You may uncheck Stack Builder
Click Next

Step 7)
You may change the data location
Click Next

Step 8)
Enter super user password. Make a note of it
Click Next

Step 9)
Leave the port number default
Click Next

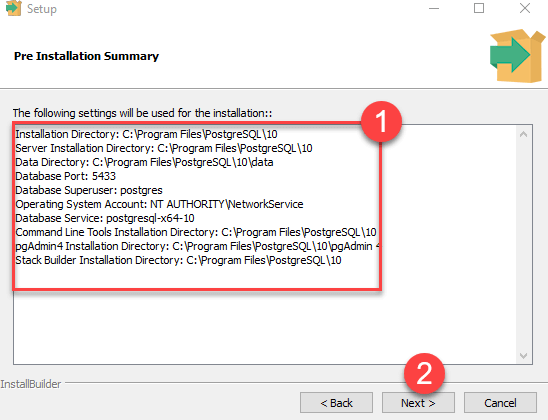
Step 10)
Check the pre-installation summary:
Click Next
Step 11) Click the next button

Step 12) Once install is complete you will see the Stack Builder prompt
Uncheck that option. We will use Stack Builder in more advance tutorials
Click Finish

Step 13) To launch PostgreSQL go to Start Menu and search pgAdmin 4

Step 14) You will see pgAdmin homepage

Step 15) Click on Servers > PostgreSQL 10 in the left tree

Step 16)
Enter super user password set during installation
Click OK

Step 17) You will see the Dashboard

That’s it to PostgreSQL installation..
Resource: Guru99
The Tech Platform
コメント