
Implementing Azure OpenAI Assistant within Microsoft Azure Logic Apps
- The Tech Platform
- Jun 18, 2024
- 5 min read
Azure Logic Apps is a cloud-based platform for creating and running automated workflows that integrate apps, data, services, and systems. It provides a visual designer to build complex processes with predefined logic blocks and connectors for various services.
Why use Logic Apps?
Automate Repetitive Tasks: Eliminate manual work by automating tasks like data processing, file transfer, sending notifications, etc.
Connect Disparate Systems: Integrate various applications and services that wouldn't naturally interact.
Improve Efficiency: Streamline processes and reduce human error.
Simplify Complex Workflows: Build multi-step workflows with clear visualizations.
Azure OpenAI Assistant is a cognitive service that leverages OpenAI's large language models to perform various text-based tasks within Logic Apps.
Why use OpenAI Assistant with Logic Apps?
Add Intelligence to Workflows: Leverage OpenAI's capabilities to automate tasks involving text analysis, generation, and translation.
Enrich Data Processing: Use text completion or summarization within workflows to manipulate or extract information from textual data.
Automate Content Creation: Generate creative text formats, marketing copy, or code snippets based on prompts.
Improve User Experience: Utilize translation capabilities to provide multilingual support within workflows.
Usage
Below are some examples demonstrating how Logic Apps can be used to automate responses to customer inquiries with the natural language processing capabilities of OpenAI Assistant:
Trigger: The Logic Apps start with an HTTP request trigger, which receives customer inquiries from a web form submission.
Parse Inquiry: The received data is parsed to extract the customer’s question.
OpenAI Assistant Action: The question is sent to the OpenAI Assistant using the HTTP action, which calls the OpenAI API with the necessary headers and body content.
Process Response: The response from OpenAI Assistant is processed to generate a suitable reply to the customer’s inquiry.
Send Reply: An email is sent back to the customer with the generated reply using the Office 365 Outlook connector.
Log Activity: Optionally, the inquiry and response can be logged into an Azure SQL database for record-keeping and analysis.
Setting Up Azure OpenAI Assistant
The Azure OpenAI Assistant requires an Azure OpenAI Service resource to function. If you already have an Azure OpenAI Service resource, just copy the API key for later use within your Logic Apps.
Integrating OpenAI Assistant with Logic Apps
STEP 1: Create a New Logic Apps
Open Azure Portal. Search "Logic apps" in the search bar and select "Logic apps".

Now click "+ Add" to create new logic apps.

In the Basic section, enter the following details:
Subscription: Choose the Azure subscription where you want to deploy the Logic Apps.
Resource Group Name: Create a new resource group or select an existing one to manage resources.
Logic App Name: Assign a unique name for your Logic App.
Region: Choose the geographical location for your Logic Apps deployment.
Plan Type: Select "Windows Plan" for Logic Apps running on Microsoft-managed VMs.
Pricing Plan: Choose an appropriate pricing tier based on your usage needs.
Zone Redundancy (Optional): Enable disaster recovery by deploying Logic Apps instances across zones.
Click "Next: Storage".


Choose a storage account type (e.g., Azure Storage) and an existing or new storage account in the Storage section.
Click "Next: Networking"

In the Networking section, configure public access (enabled/disabled) and network injection (optional) based on your security requirements.
Click "Next: Monitoring"

In the Monitoring section, enable Application Insights for monitoring and select an existing or new Application Insights resource.
Click "Next: Tags". (Optional for adding tags)

Click "Review + create".
Review all the information you entered and click "Create" to deploy the Logic Apps.

Your Logic app is created and deployed. This will take several minutes. After completing the process, go to the resources.
STEP 2: Open Logic Apps Designer
Once deployed, navigate to your Logic Apps and click "Create a workflow in Designer".

Click on + Add to create the first workflow.

A small dialog box will appear. Enter the name of the workflow. Choose between "Stateful" (maintains data between steps) or "Stateless" (independent steps).
Click "Create."

After that, click on the name of your newly created workflow. For example, click on "MyWorkflow".
In the left panel, click on Designer.

STEP 3: Add a Trigger
The designer displays "Add a trigger" - the starting point for your workflow.
A workflow always starts with a single trigger specifying the condition to meet before running any action in a workflow.
Click on "Add a Trigger".

A dialog box will appear. In the search bar, type "Request". Click the "Request: When a HTTP request is received" option.

Then click on "When a HTTP request is received".
In the "Request body JSON schema" section, define the expected JSON format for incoming HTTP requests to trigger the workflow.

Click save to save the workflow
STEP 4: Add OpenAI Assistant
Click + and select "Add an action".

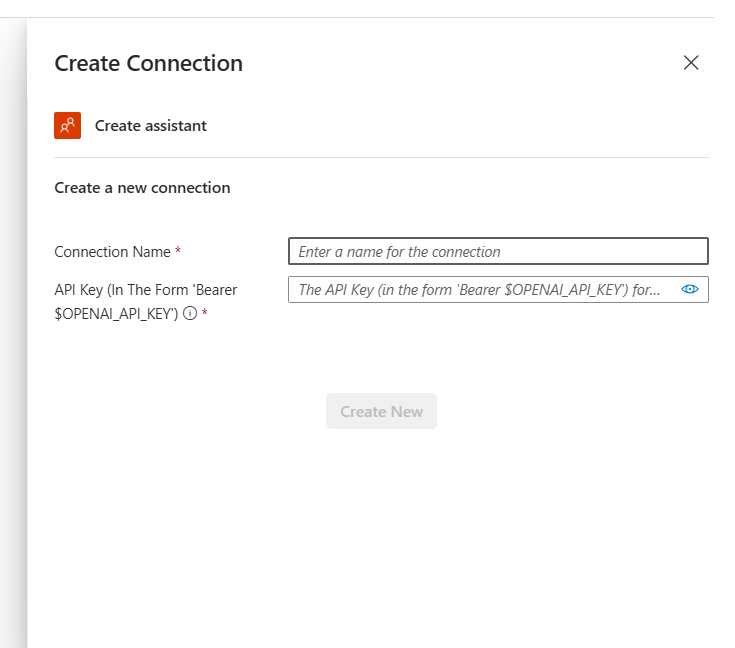
Search for "OpenAI Assistant" in the search bar. Select "Create assistant".

Configure the OpenAI Assistant with Connection name and API key.
Now, add actions using connectors to perform tasks based on inputs, for example, MSN Weather.
Again, click + to and select "Add action".
In the search bar, type "MSN weather" and choose the "Get forecast for today" action from the MSN weather connector.

In the action settings, provide:
Location: Enter Seattle" or any specific location you need the forecast for.
Units: Choose between Imperial (For Fahrenheit) and Metric (for Celsius).

STEP 5: Add a Response
Click on "Get forecast for today". Search for "Request" in the search bar and select "Response" action.

Configure the response action with the following details:
Status code: Enter 200 if you’re returning a successful response.
Headers: Add any headers needed for your response, such as Content-Type.
Body: Enter the dynamic content or custom text you want to return in the response.
Advanced options: Set any advanced parameters if required.

STEP 6: Test
Click "Save" at the top of the Logic Apps Designer to save the workflow. Use the “Run” button to test your workflow and ensure it’s working as expected.
STEP 7: Configure Azure OpenAI Studio
Navigate to the Azure OpenAI Studio and access "Assistant (Preview)".
Create a new assistant by entering an Assistant Name and providing instructions for its behavior.
Click on the "+ Add function".
Locate and select LogicApps from the list of available resources.

Click Save to link your Logic Apps with Azure OpenAI Studio.

STEP 8: Test Prompt
Enter a test prompt, such as “How is the weather in Seattle today?” in your assistant’s configuration to verify that it triggers the correct Logic Apps workflow.

Advanced Use Cases
Dynamic Content Generation:
Use Case: Automatically generate personalized emails, reports, or social media posts based on user interactions or data triggers.
Benefit: Saves time and resources by automating content creation, ensuring consistency and relevance.
Data Analysis and Reporting:
Use Case: Analyze large datasets to extract insights, summarize findings, and generate comprehensive reports.
Benefit: Enhances decision-making by providing actionable insights from complex data without manual analysis.
Integrating with Power BI:
Use Case: Use OpenAI Assistant to interpret natural language queries and generate visualizations in Power BI.
Benefit: It allows users to interact with their data more intuitively, making data analytics accessible to a broader audience.
Integrating with SQL Server:
Use Case: Automate database management tasks such as querying, updating, or generating database reports using natural language commands.
Benefit: Streamlines database operations and reduces the need for specialized SQL knowledge among users.
These use cases use the AI capabilities of OpenAI Assistant to enhance the functionality of Logic Apps, making them more intelligent and responsive to business needs.
Conclusion
Implementing Azure OpenAI Assistant within Microsoft Azure Logic Apps unlocks a new level of automation and intelligence for your workflows. This powerful integration empowers you to leverage the capabilities of Azure OpenAI's large language models directly within your Logic Apps processes.
By text analysis, code generation, and summarization, you can streamline complex workflows, improve decision-making, and enhance user experiences. As Azure OpenAI Assistant continues to evolve, the possibilities for innovation within Logic Apps will only expand.
For developers and businesses seeking to unlock the full potential of their automation strategies, implementing Azure OpenAI Assistant within Microsoft Azure Logic Apps is a strategic move that promises significant efficiency gains and a competitive edge.
Comments