Observer APIs are very useful to detect changes in the applications. The following are the different types of observer APIs in JavaScript. Each type observes different things.
Let’s observe something about Observer APIs.
Observer
Observer is an object which monitors or observes something continuously and it notifies after something is changed.
Observer APIs
Observer APIs are very useful to detect changes in the applications. The following are the different types of observer APIs in JavaScript. Each type observes different things.
MutationObserver
IntersectionObserver
ResizeObserver
PerformanceObserver
Mutation Observer:
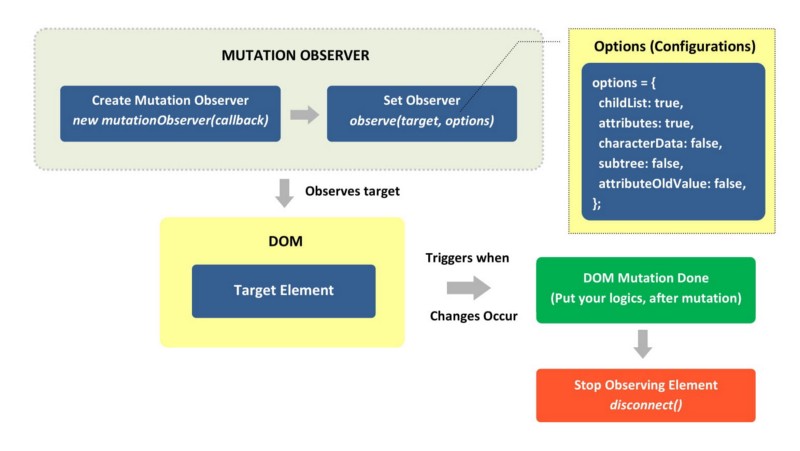
Mutation Observer observes the DOM tree. It waits for the changes being made to the DOM. Mutation Observer interface will notify us when the particular element’s attributes, text or contents changed. And also it monitors the child nodes whether it has been added or removed.
Mutation Observer Flow Diagram
Concepts:
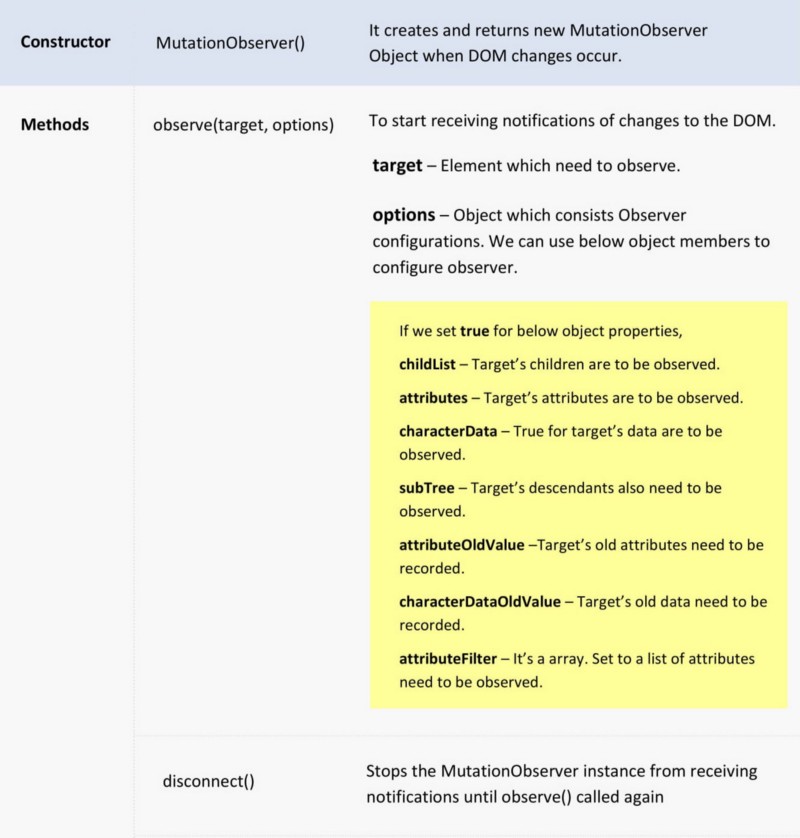
Key Concepts
These are the key concepts in Mutation Observer. It is not possible to read all these concepts and understand what they are doing. So, see some use cases and code examples in further and then you will have more clear understanding.
Use Cases:
Find immediate Undo & Redo values of DOM Elements.
Remove unwanted DOM elements such as advertisements that are coming from third-party libraries.
Resize DOM elements dynamically.
Debugging third-party libraries are easier; we can track element creation and property changes.
We can use Mutation Observer wherever we want to track DOM Elements that is the core concept of Mutation Observer.
Now, I am going to take one use-case from the list and will explain it briefly. Try other use-cases on your own. It will be more interesting!
Find immediate Undo & Redo values of DOM Element:
Mutation Observer Example
Here it is the source code. Actually, it is very simple to implement. I just want to explain that particular observer part. Other coding parts consist of basic JavaScript code and I hope those are understandable. Let see this use-case step by step.
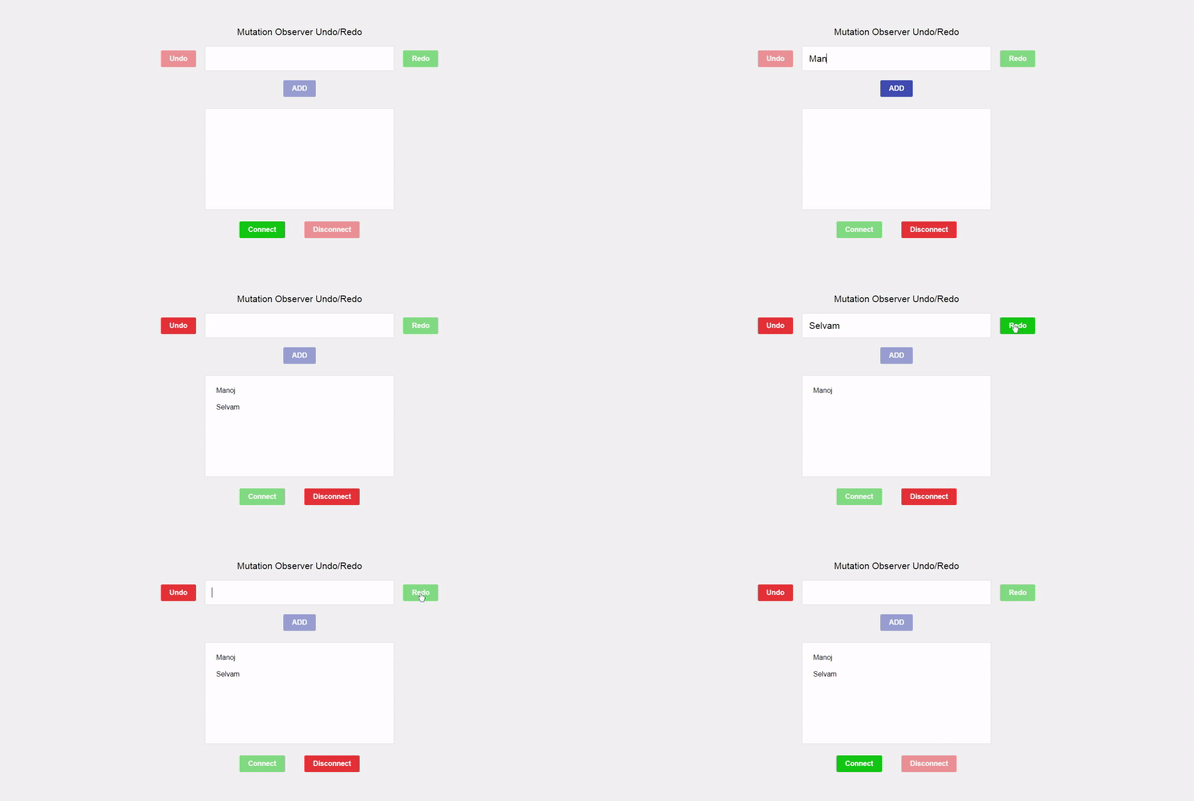
Note: The mutation Observer only stores previous changes. We can’t able to see history of changes for that particular DOM element. So, this example will work with two list items. Before check that output, ensure that you start the observer by clicking connect button.
Step 1: Setup the Basic UI Logics
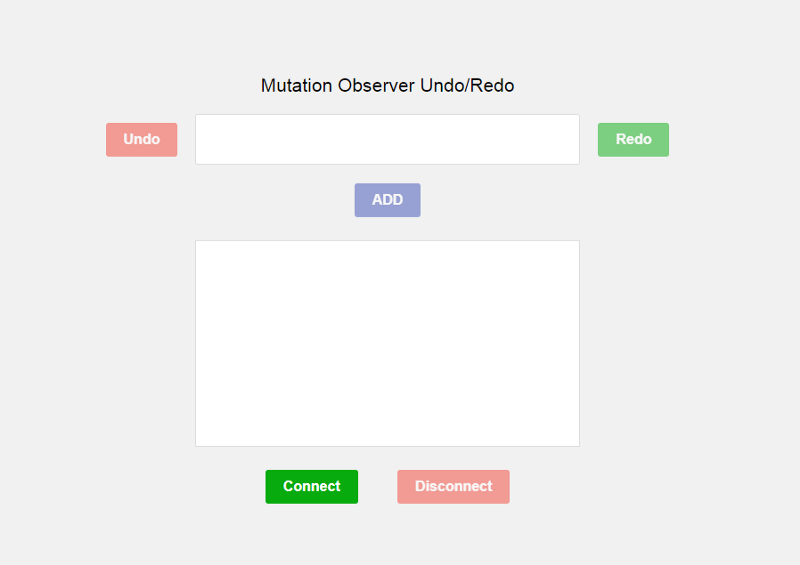
Setup the basic logics from the above codepen source code. Run the page now. The output:
Mutation Observer UI Output
Step 2: Create Mutation Observer
Let’s create a mutation Observer and set target and configuration for that Observer.
/* Mutation Observer Targets */
var target = document.querySelector('ol');
 var inputTarget = document.querySelector('.editContent');
 /* Mutation Observer Configuration */
 var config = {   childList: true }
 /*Mutation Observer Creation */
 var Observer = new MutationObserver((mutationrecords) =>
 {
 console.log(mutationrecords);
 });
 /* Start Mutation Observer for List */
 Observer.observe(target, config);
 /* Start Mutation Observer for input contentEditable div element */ Observer.observe(inputTarget, config);<>
We have two Observers here. One is for observing the ordered list and another one is for contentEditable div element which is inputTarget.
I have set the target elements and config Object. We can set multiple object members in the configuration object. But here, we need childList property only.
If you observing attributes of a particular DOM element, make sure you are using attributeFilter property in the configuration object. Because there is no need to observe all attributes of that element. It will affect the performance of the page. Let see the output for this code.
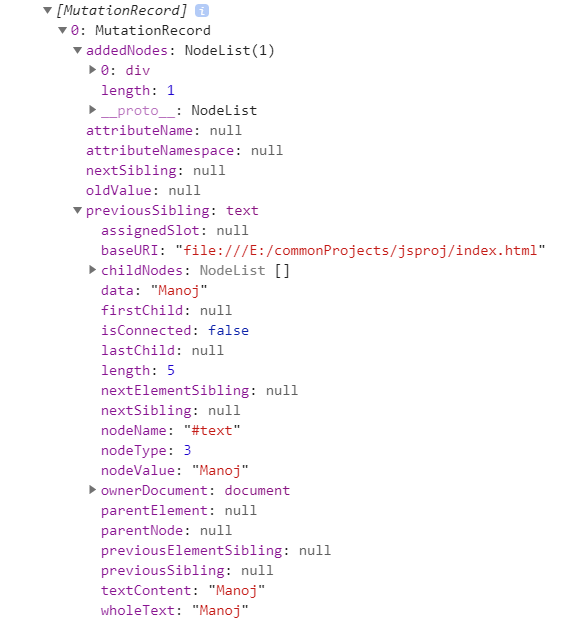
Console:
Console Output
I have added the string named ‘Manoj’ and clicked the Add button. So observer occurs the DOM change and it triggered above console output. This output belongs to the order List element change. So, here we can see addedNodes array length is one.
Similarly, We also got a new mutation observer object for removing the string from the input box( .editContent class). But I didn’t show that. Both look similar only. The only difference between them is the addedNodes and removedNodes array length.
Step 3: Add Undo/Redo Logic inside Callback
/* Mutation Observer Creation */
var Observer = new MutationObserver((mutationrecords) => {
/* Add callback logics here */ });
let connect = () =>{
/* Start Mutation Observer for List */
Observer.observe(target, config);
/* Start Mutation Observer for input contentEditable div element */   Observer.observe(inputTarget, config); }
/* Disconnect Observer */
let disconnect = () =>{   Observer.disconnect();
}<>
After clicking the button (such as Add, Undo, Redo) DOM will change. Mutation Observer will trigger. So, now we can put our logic inside the callback.
Mutation Observer object will give details such as addedNodes, removedNodes, and so on. Obviously, these details are enough to get undo or redo of that particular DOM element.
Step 4: Disconnect Observers
/* Disconnect Observer */
let disconnect = () =>{
 Observer.disconnect();
 }<>
Don’t forget to disconnect the Observer after you have done everything. Because it frequently observes the DOM until we call the disconnect() method.
Disconnect method stops all observers at once it been called. If we use lots of observers and complex logic in our page then there is the chance to face performance issues. So don’t forget to disconnect observers and maintain the code cleaner.
Output:
Output
That’s cool, right? We have a lot more other use cases too. And we can try mutation observers in attributes, subtree, and so on. Just try it guys, those are very easy and interesting.
Intersection Observer
Intersection Observer API which is my favorite observer in the list. An intersection observer observes the DOM element’s visibility and positions. we can control the element’s loading and animations based on the target element’s visibility and positions. Sounds good, right? Let’s deep dive into intersection observers.
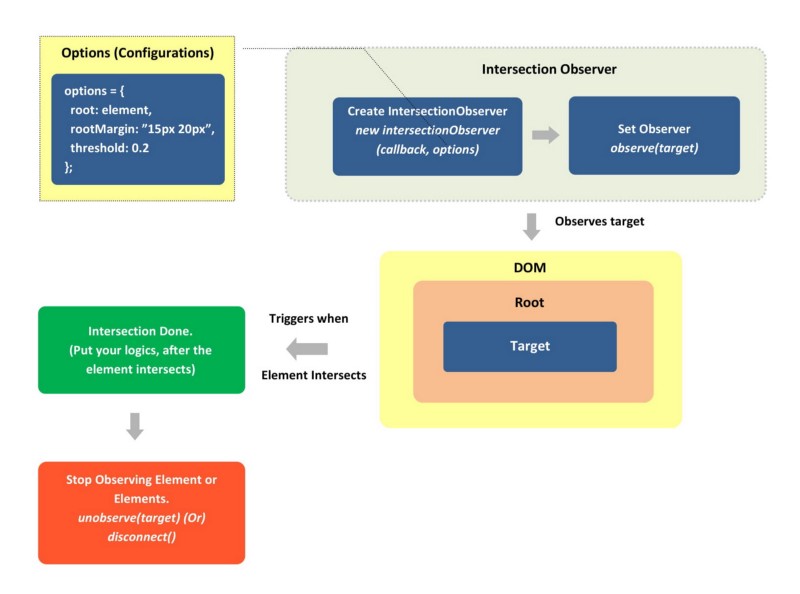
Intersection Observer Flow Diagram
Intersection Observer API is very similar to Mutation Observer. We can compare both flow diagrams. Flow is the same but we can identify some differences in configurations properties and methods.
Concepts:
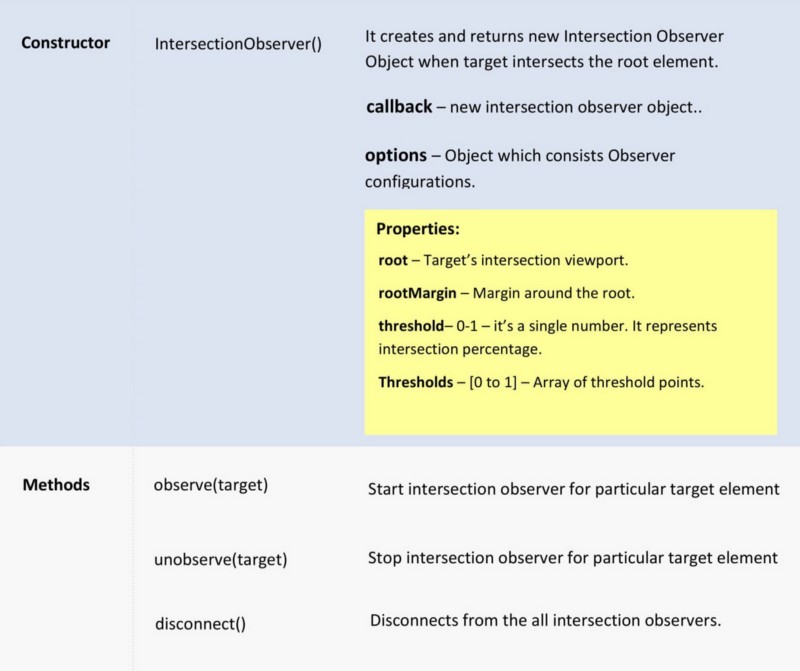
Below are the key concepts of Intersection Observer API. Those are very minimal and most of the concepts we already learned in the mutation observer section. So, It is very simple to understand and use.
Key Concepts
Use Cases:
Lazy loading — Loading the contents and images when it comes to the viewport or page scroll.
Infinite Scroll — We can implement infinite scroll using intersection Observers.
Animations — Performing animations when the page is scrolled.
Track the user interactions — Whether the user fully reads the article or advertisements. We can pause the timer if the user not seeing the ad.
Play videos — Trigger the play button while it comes under the viewport.
We can use Intersection Observer wherever we want to track DOM Elements positions and visibility that is the core concept of Intersection Observer.
Let’s take one use-case from the list. I am going to take the third one — Animations. Because that is more interesting one. After seeing this implementation, we can get more clarity in Intersection Observers.
Animations — Performing animations when the page is scrolled:
This is a very basic animation example using an intersection observer. Let’s see this example step-by-step.
Step 1: Setup the Basic UI Logics
Setup the basic logics from the above codepen source code. Run this code. Now, we can able to see the output.
Intersection Observer UI Output
Step 2: Create Intersection Observer
Create an intersection observer object and set target and configuration for that observer.
var box = document.querySelector('.text');
//Target
var config = {
// we can set config such as root, rootMargin, threshold.     threshold: 1
}
 var callback = (entries)=>{
 console.log(entries);
 }
 var observer = new IntersectionObserver(callback, config);
 //Create observer
 let connect = () =>{
 observer.observe(box);
 //Start observer
 }
 let disconnect = () =>{
 observer.unobserve(box);
 //Stop observer }<>
have set the target element and config Object. We can set multiple object members in the configuration object.
Let see the output in the console.
Console:
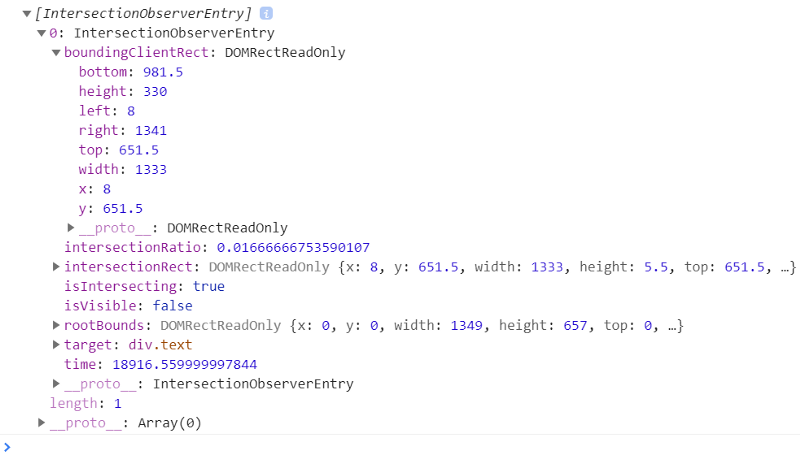
Intersection Observer Console
The intersection Observer notifies when the target intersects the viewport. Here, we can see details about the intersected element. We can use any of these details such as positions, target elements, isIntersecting, and so on.
Step 3: Add Animation Logic inside Callback
var callback = (entries)=>{
//Animation code logic comes here
}<>
We have two buttons in UI that are “ connect” and “disconnect”. If we click the connect button observe(target) method will trigger. So the intersection Observer will start to watch the target element.
When the target intersects the viewport callback will trigger. So, animation logic will run. There is no complex logic here. I just add and remove CSS classes named ‘active’.
Step 4: Disconnect Observers
let disconnect = () =>{
observer.unobserve(box);
//Stop observer.
observer.disconnect();

//Stop all observers. }<>
This is a very important step. We can disconnect an observer by calling the ‘unobserve()’ method or we can use the disconnect() method, It will disconnect all observers at once.
Output:
That looks nice, right? We have a lot of other use cases too. Just try it guys, those will be very interesting.
Source: InDepth.Dev











Comments