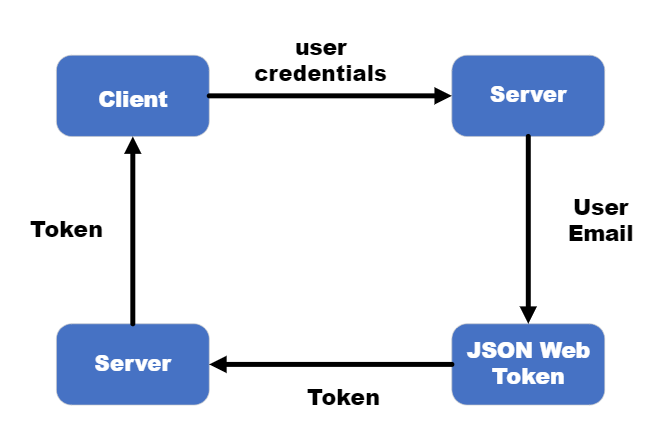
JSON Web Token (JWT) is a token-based authentication mechanism that provides three layers of protection when all the parts are combined together. These three processes are integral components of the JWT, and they are as follows:
Header: The header is the first part of the JWT and is used to define the algorithm used to create the token. It contains information about the token type and the signing algorithm employed to secure the token. The header is encoded using Base64Url encoding.
Payload: The payload, also known as the claims or the body, is the second part of the JWT. It encapsulates any data that needs to be sent along with the token. The payload can contain various claims, such as user information, permissions, or any custom data required for authentication purposes. Similar to the header, the payload is also Base64Url encoded.
Signature: The signature is the final part of the JWT and is used to verify the authenticity of the token. It ensures that the token has not been tampered with during transmission or storage. The signature is created by combining the encoded header, encoded payload, and a secret key known only to the server. The resulting string is then hashed using a specified algorithm, such as HMACSHA256 or RSA. The signature is appended to the token, forming the complete JWT.
When all three parts (header, payload, and signature) are combined, the JWT is ready for use. It can be sent over the network or stored in client-side applications. The receiving party can verify the authenticity of the token by decoding the header and payload, recalculating the signature using the same algorithm and secret key, and comparing it with the provided signature. If the signatures match, it confirms the integrity and authenticity of the token.
Overview
This blog provides an overview of working with JWT in the backend for user authentication. It covers creating signup, login, and decodeToken endpoints. Users receive a JWT token upon successful signup or login, containing an expiration time and user data. Subsequent requests must include this token in the header. We decode the token to verify its authenticity and allow access. JWT enhances security and ensures secure communication between users and servers.

Step 1: Setting up a basic repository and installing the required packages
Install the necessary packages using yarn:
yarn add express body-parser cors nodemon axios jsonwebtoken.These packages are required for setting up the basic repository and implementing JWT authentication.
Step 2: Creating basic routes for login and signup
In this section, you will create a file named authRoutes.js in the routes folder.
For this, you have to Import the required packages:
const express = require('express');
const authRouter = express.Router();
const jwt = require('jsonwebtoken');
Define the routes for login and signup:
authRouter.get('/login', (req, res) => {
  res.send('This is the logged in route');
});

authRouter.get('/signup', (req, res) => {
  res.send('This is the signup route');
});
Export the authRouter for usage in other files:
module.exports = authRouter;Step 3: Testing the routes
You can test the routes by redirecting to the endpoints /login and /signup on localhost port 3000.
Step 4: Creating a token
In this section, you will install the dotenv package:
yarn add dotenv.Now, Import dotenv in your server.js file:
const dotenv = require('dotenv');.Add the dotenv.config() line to load environment variables from the .env file.
Now, generate a token using the sign method of JWT:
const token = jwt.sign(
  { email: email },
  process.env.JWTSecretKey,
  { expiresIn: '14d' }
);
In the above code, the email is used as the payload for signing the token, ensuring each user has a unique email ID.
The process.env.JWTSecretKey refers to the key stored in the environment variable file.
Step 5: Sending signed tokens
Here, you will update the /login route to handle the POST method instead of GET:
authRouter.post('/login', (req, res) => { ... });.Now, extract the email and password from the request body:
const { email, password } = req.body;.Here, you will check if the required fields are present, and if not, return an error response:
if (!email || !password) {
  res.status(204).json({
    success: false,
    message: 'Email and Password are required'
  });
  return;
}
Now, generate a token and send it in the response:
const token = jwt.sign(
  { email: email },
  process.env.JWTSecretKey,
  { expiresIn: '14d' }
);

res.status(200).json({
  success: true,
  message: 'User logged in successfully',
  data: { token: token, email: email }
});
Step 6: Decoding tokens
In this, you will update the /decodeToken route to handle the POST method:
authRouter.post('/decodeToken', (req, res) => { ... });.Now, Extract the email from the request body:
const { email } = req.body;.Extract the token from the Authorization header:
const token = headers.split(" ")[1];.Now, Verify the token and check its authenticity:
const jwtVerifyToken = jwt.verify(token, process.env.JWTSecretKey);

if (jwtVerifyToken.email !== email) {
  res.status(404).json({
    success: false,
    message: 'Invalid token'
  });
}
If the token is valid, send a success response with the token and email:
res.status(200).json({
  success: true,
  data: {
    token: token,
    email: email
  }
});

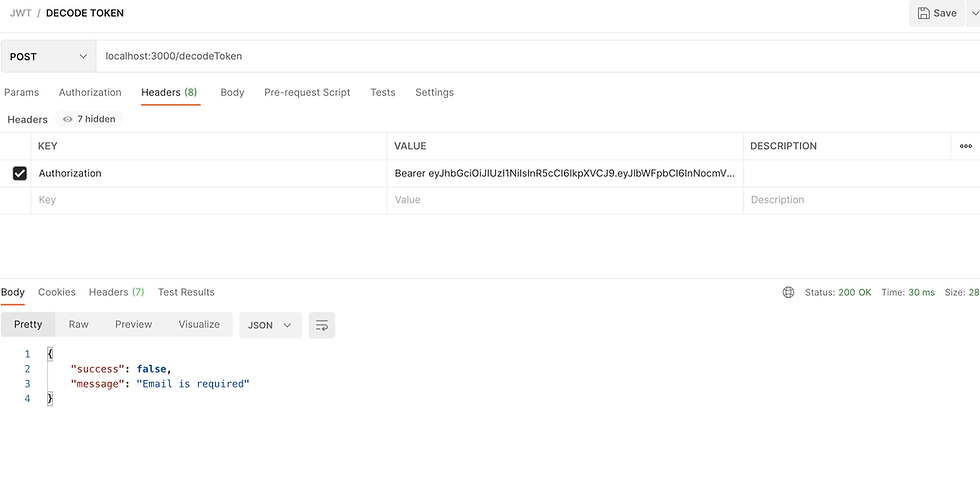
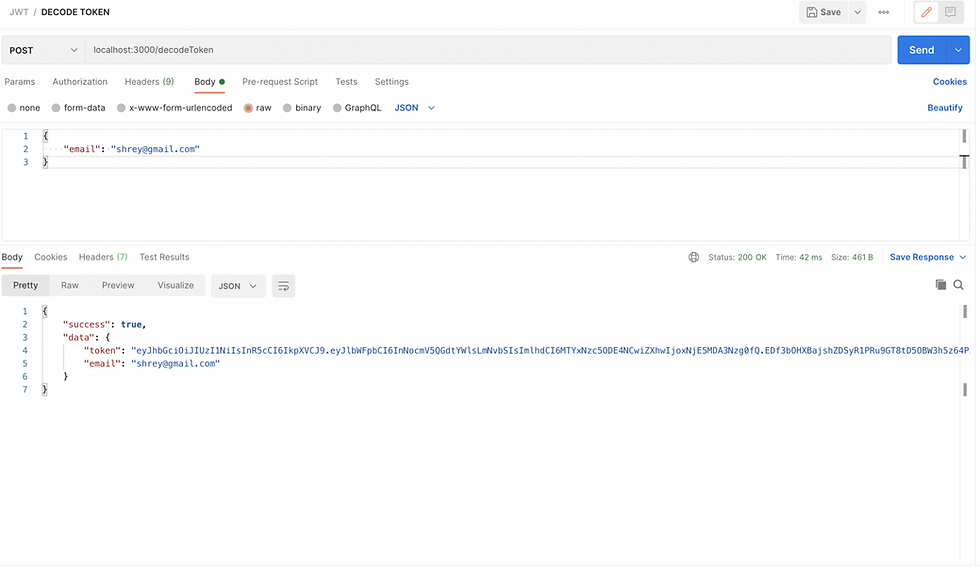
The left image is when no email is added and the right image is when no headers are given in request

By following these steps and implementing the code, you can create a basic repository using Express, handle user authentication with JWT, and test the routes using Postman or other similar tools.
Full code:
const express = require('express');
const bodyParser = require('body-parser');
const cors = require('cors');
const jwt = require('jsonwebtoken'); require('dotenv').config();

const app = express();
app.use(bodyParser.json());
app.use(cors());

const authRouter = express.Router();

authRouter.get('/login', (req, res) => {
    res.send('This is the login route');
});

authRouter.get('/signup', (req, res) => {
    res.send('This is the signup route');
});

authRouter.post('/login', (req, res) => {
    const { email, password } = req.body;

    if (!email || !password) {
         res.status(204).json({
             success: false,
             message: 'Email and Password are required',
             });
        return;
    }

    const token = jwt.sign(
        { email: email },
        process.env.JWTSecretKey,
        { expiresIn: '14d' }
    );

    res.status(200).json({
        success: true,
        message: 'User logged in successfully',
        data: { token: token, email: email },
    });
});

authRouter.post('/decodeToken', (req, res) => {
    const { email } = req.body;
    const headers = req.headers['authorization'];

    if (!headers) {
        res.status(404).json({
            success: false,
            message: 'Token is required',
        });
        return;
    }

    if (!email) {
        res.status(204).json({
            success: false,
            message: 'Email is required',
        });
        return;
    }

    const token = headers.split(' ')[1];

    try {
        const jwtVerifyToken = jwt.verify(token, process.env.JWTSecretKey);

        if (jwtVerifyToken.email !== email) {
            res.status(404).json({
                success: false,
                message: 'Invalid token',
            });
            return;
        }

        res.status(200).json({
            success: true,
            data: {
                token: token,
                email: email,
            },
        });
    } catch (error) {
        res.status(404).json({
            success: false,
            message: 'Invalid token',
        });
    }
});

app.use('/auth', authRouter);

const port = 3000;
app.listen(port, () => {
    console.log(`Server running on port ${port}`);
});
This code combines the routes for login, signup, generating a JWT token, and decoding the token's authenticity. Make sure to add the necessary packages and environment variables to ensure the code runs correctly.
Conclusion
The approach described above provides a highly secure method for verifying user authenticity and granting access to our servers. JSON Web Tokens (JWT) already offer a robust two-layer security mechanism, and we have further enhanced it by including additional data in the token's payload, adding a third layer of security.
One additional advantage of this process is that we can directly store these JWT tokens in the browser's cookies or send the token itself as a cookie from the API. This approach simplifies the verification process since we only need to check the cookie in the browser and validate its integrity within the frontend application to grant the user access to protected routes.

Comments