Source code files for Canvas apps
- The Tech Platform
- Jan 15, 2021
- 7 min read
Imagine using GitHub with a Canvas app. And I mean using GitHub as it was meant to be used, with text diffs between versions, and not just storing opaque .msapp blobs. Teams can collaborate on apps: they can work on private branches, diff changes, create pull requests for review, and merge into master.
Imagine using Visual Studio Code with a Canvas app, a full screen editor with search and replace.
We are very pleased to announce the experimental release of a tool that enables these modern miracles. It is but the first step as we make application lifecycle management easier for formulas and Canvas apps.
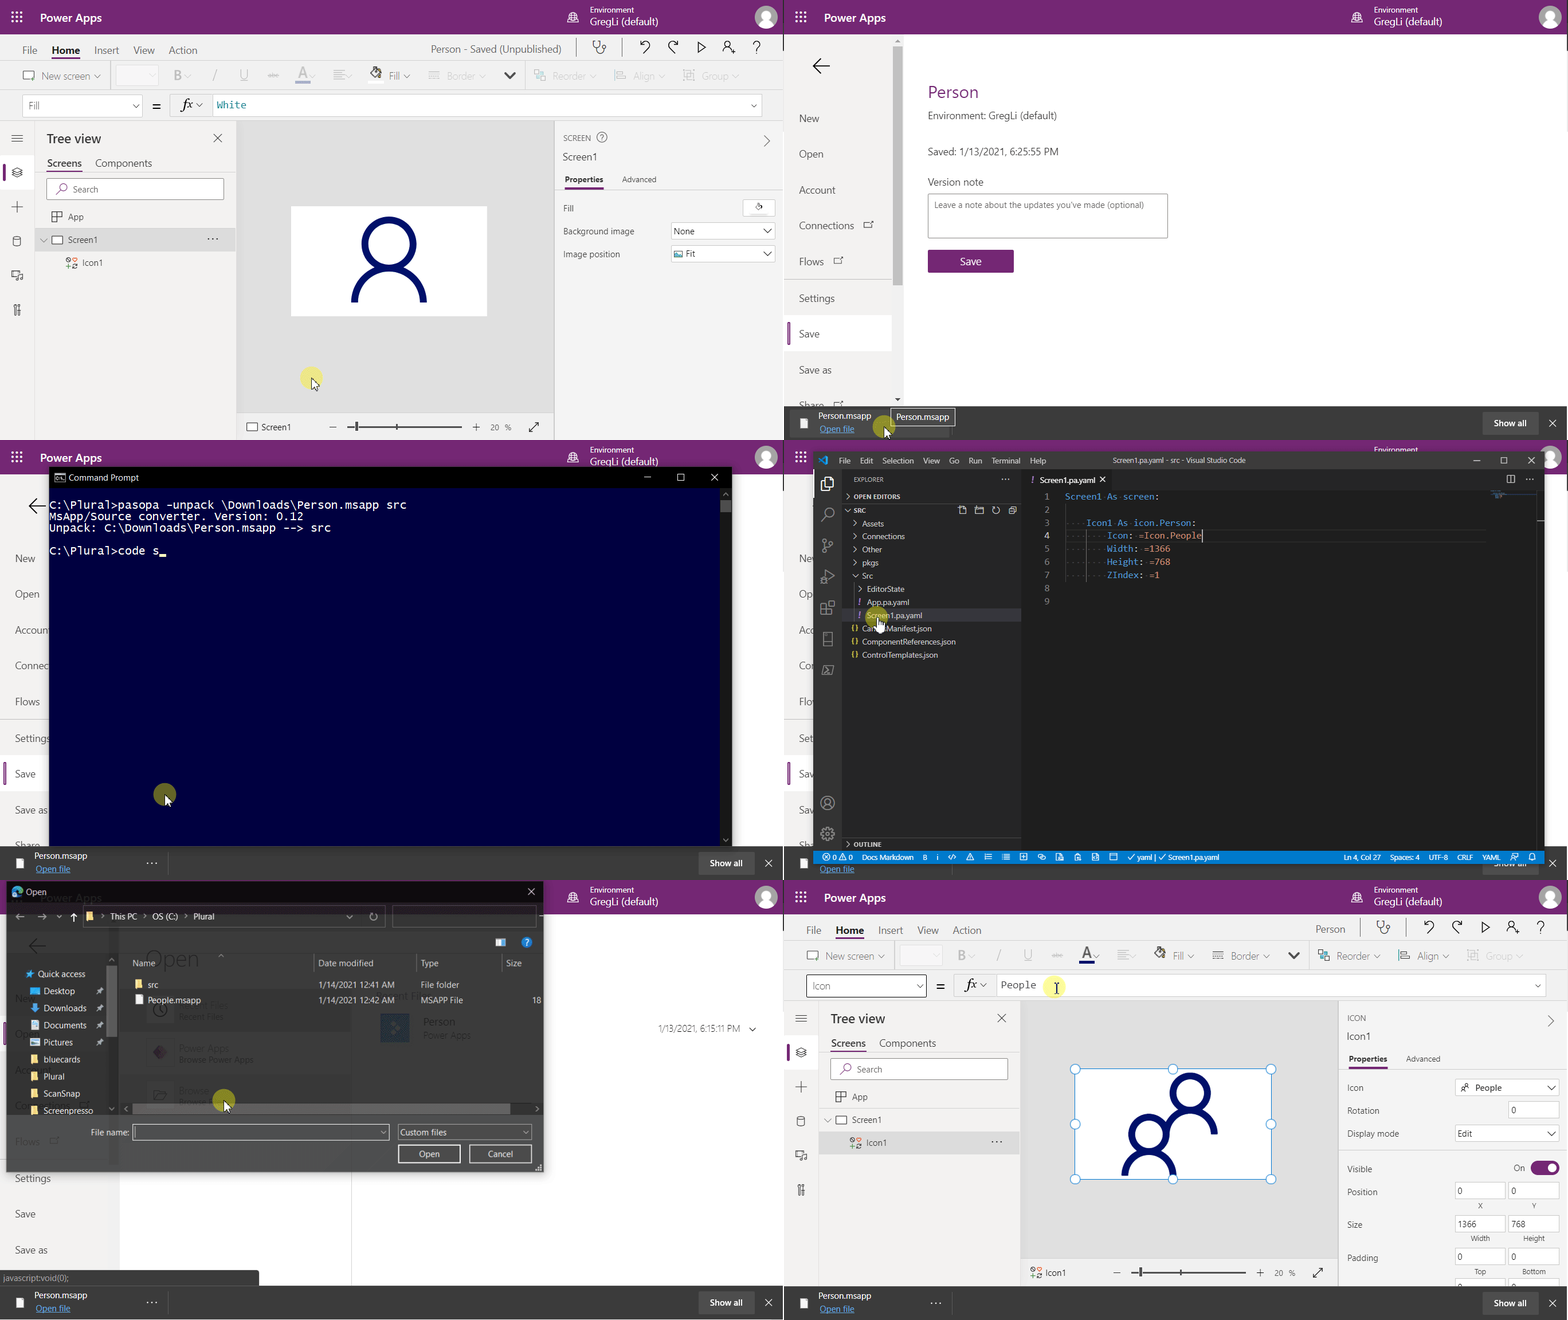
To illustrate, in this short video we will change the Icon property of an Icon control with these steps:
Export an app as an .msapp file with Save As.
Unpack the .msapp to individual source files using our new tool.
Make a simple change to a formula using Visual Studio Code.
Pack the modified source files back into an .msapp file.
Open the modified .msapp file in Studio and see the result of my change.
This new tool enables the source code of a Canvas app to be effectively managed in GitHub or Azure DevOps. Diffs, pull requests, and comments can be based on lines of formula text rather than .msapp blob files.
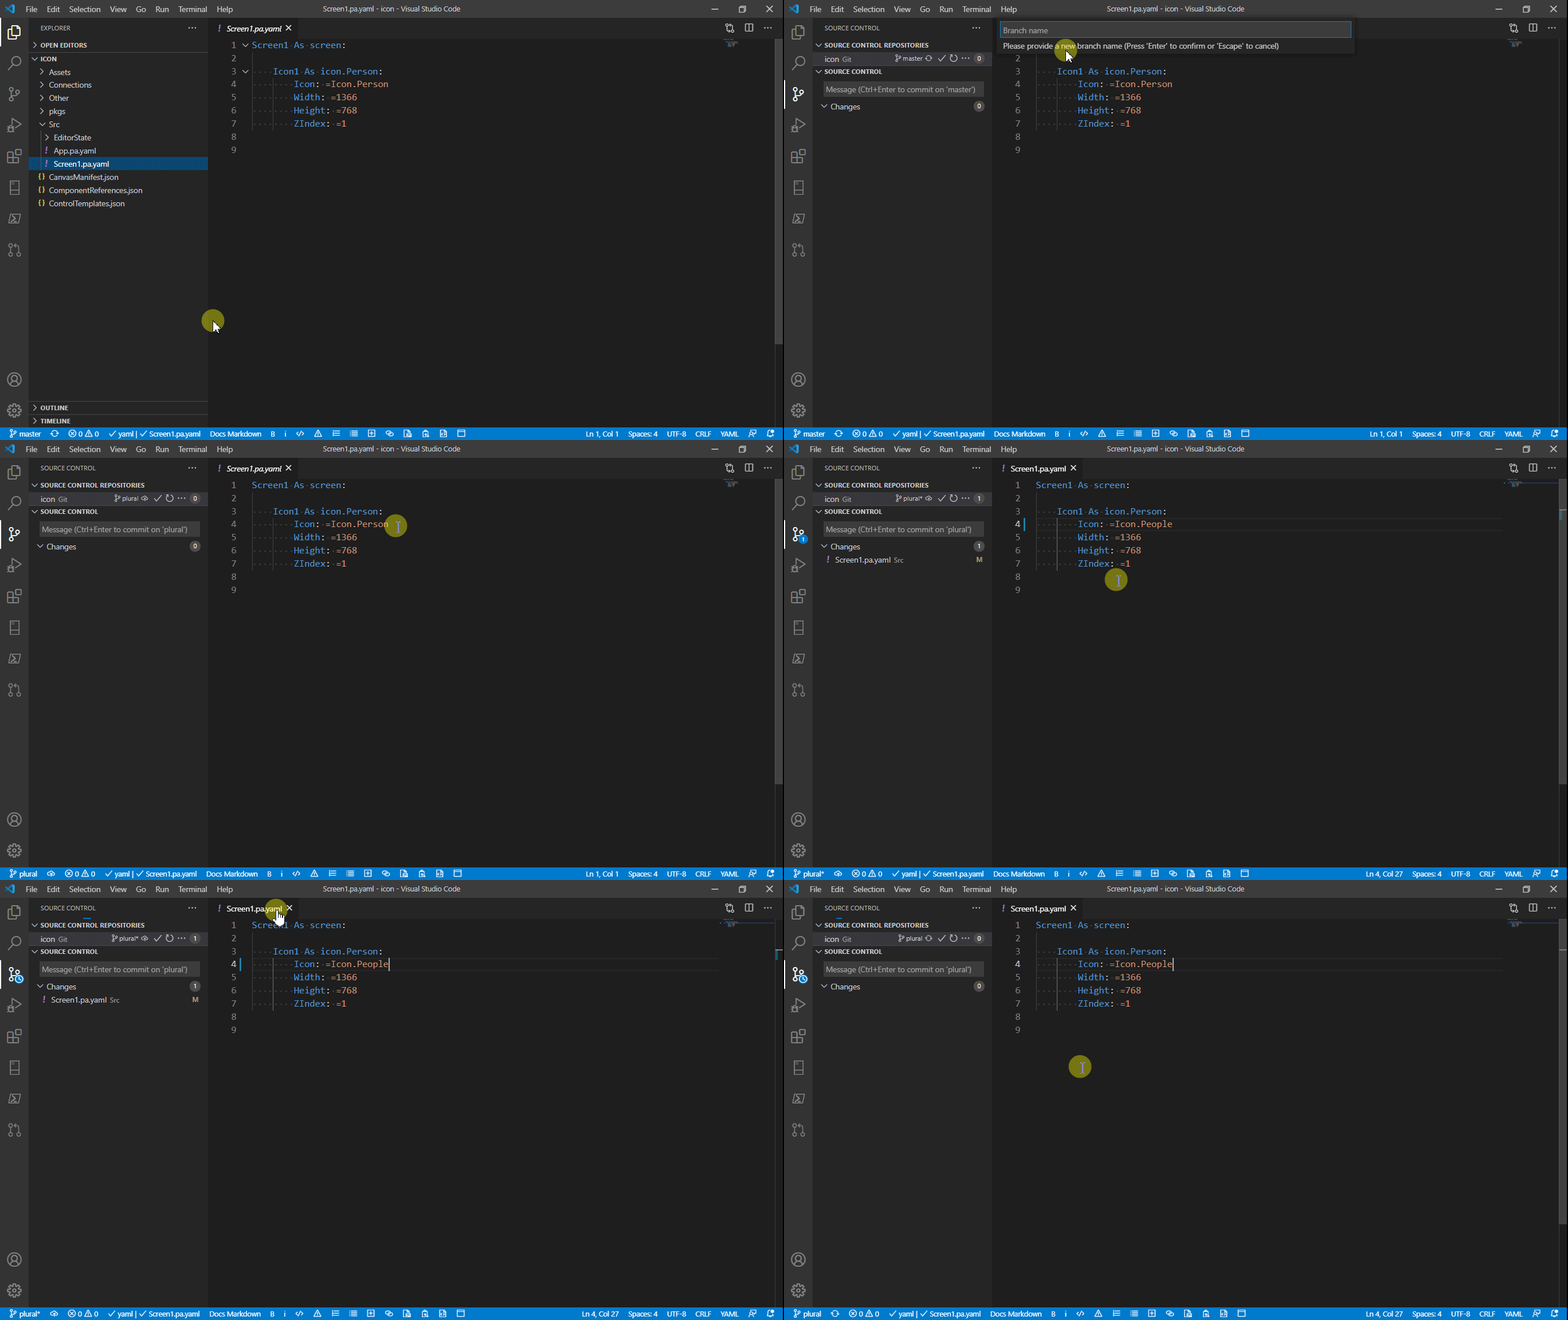
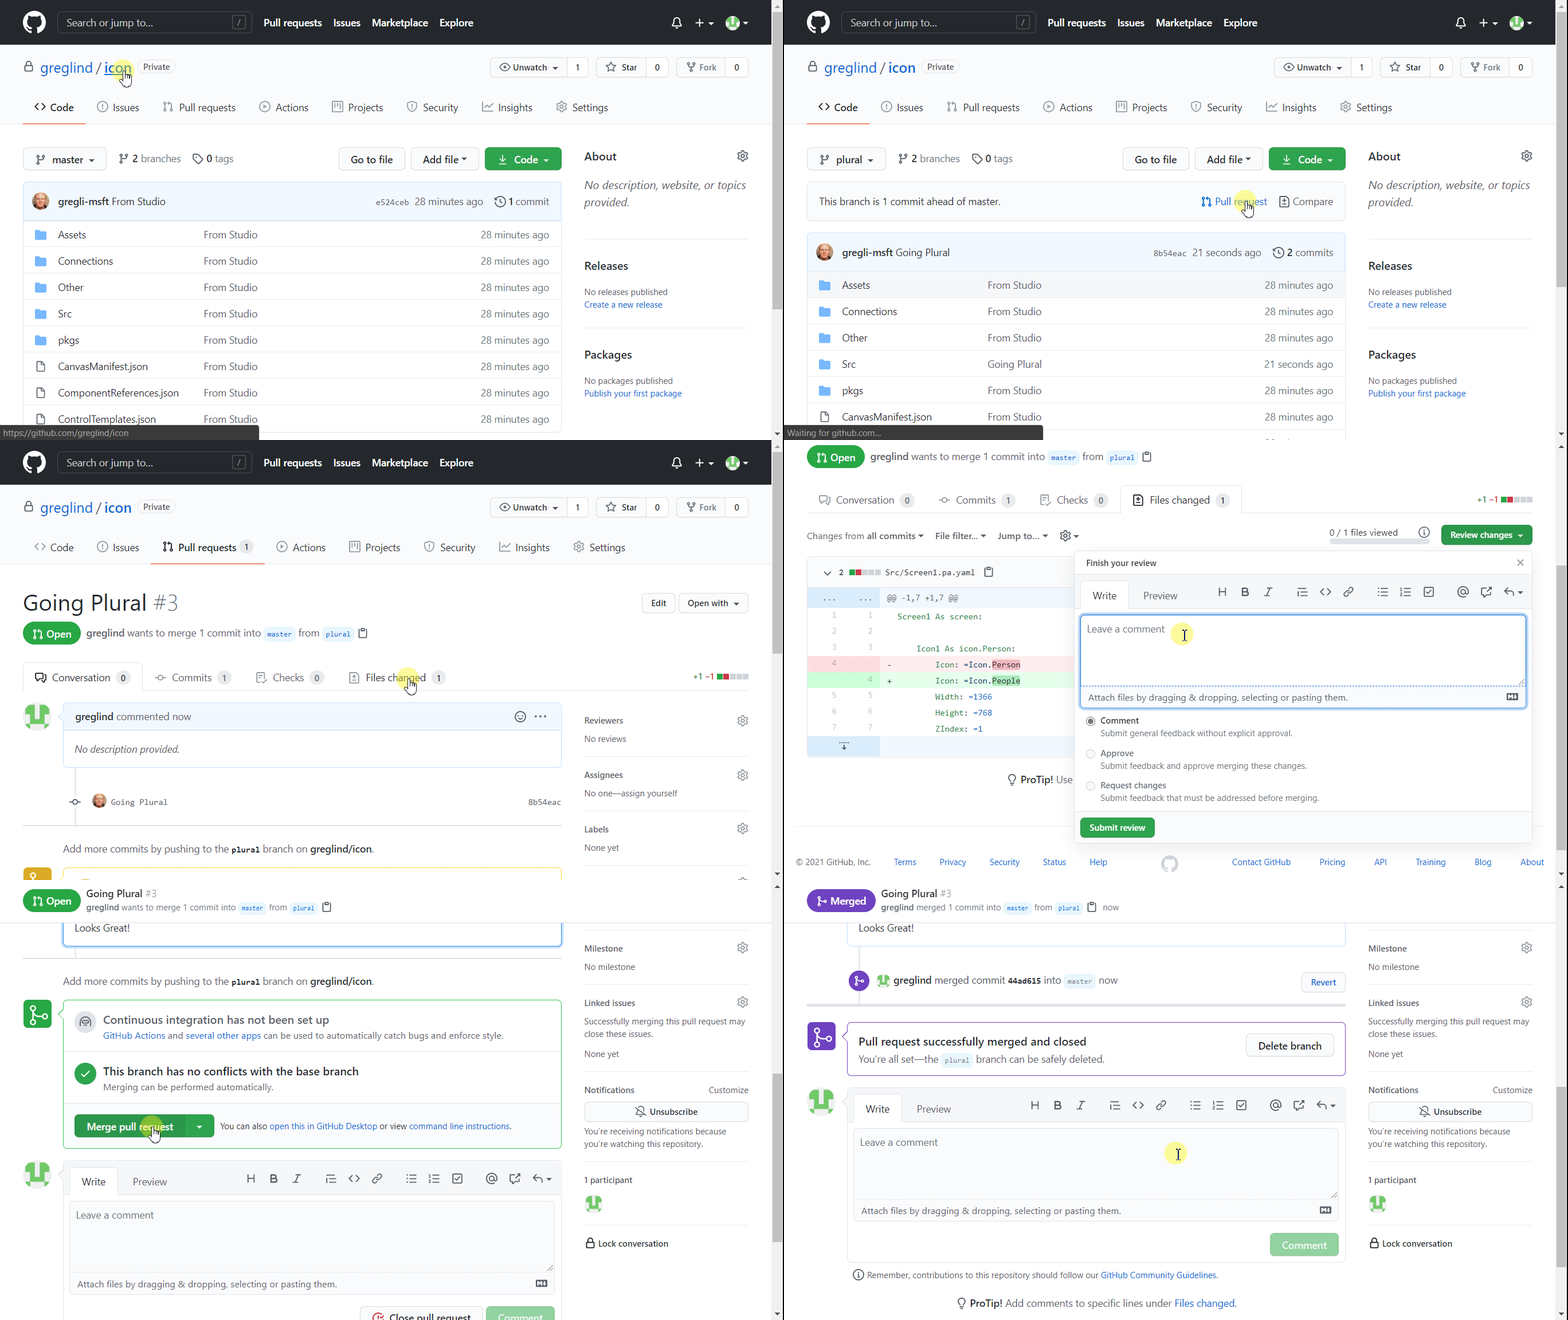
In this next example, we’ll make the same change to the Canvas app stored in GitHub as text source code files. We’ll go through all the steps required to manage the change, have it reviewed, commented on, merged in to master, and the result tested.
We’ll work with this GitHub repo in Visual Studio Code. First we’ll create a new branch, make modifications there (change the icon from “Person” to “People”), and push the changes to our new branch on GitHub.
Back on GitHub, we’ll create a pull request for this new branch to merge into master. We’ll have an opportunity to review the one line change, to comment on the change, and to approve the merge. Canvas apps become a part of your existing application lifecycle management workflow.
And after the merge has been made, we sync changes back to our client and recreate the .msapp file. We can now load the file into Power Apps Studio and see our change.
Excited? These examples only scratches the surface of what is possible. By supporting text files, all the tools that you love and all the unique workflows that you have created can now be used with Canvas apps too.
Limitations
But before you get too excited, let’s reiterate that this is experimental. We are making this available now for your feedback and to find issues.
Please do not convert all your .msapp files to source files and throw away the originals. We are working toward a day when you can do this, but that is not today. By far, Power Apps Studio is still the best place to edit a Canvas app. We are introducing a new way to manage and edit Canvas apps, a companion to Studio, not a replacement.
There are some known limitations and gotchas:
Outside of Studio, don’t add a control with the same name as one that already exists. This can happen easily if two different authors use Power Apps Studio to add a button control, resulting in two different Button1 controls. When collaborating with others, we recommend renaming controls to something appropriate and hopefully unique within the app.
The source code file may expose options that Studio does not. For example, the ZIndex property is exposed on controls. In Studio, this isn’t a full fledged property and can only be moved up or down with a static value. If you put a formula here, the app may not operate properly.
Distribution
So, how do you get the cool PASopa tool used above? To download and use:
Install .NET Core 3.1.x (x64).
Clone the repo at https://github.com/microsoft/PowerApps-Language-Tooling
Run build.cmd in the root directory.
You can find PASopa.exe and needed dependencies in the bin\Debug\PASopa directory.
More details on building are available in the GitHub readme.
I did say this was experimental. 🙂 This isn’t going to be for everyone at this time and that is OK. At this early juncture we are looking for savvy early adopters that can give us good feedback on the directory structure and file format. Eventually we will be integrating this directly with the Power Apps CLI and it can be run by anyone without needing to do a build.
We are releasing this tool as open source, and that will still be true even after we integrate with the Power Apps CLI. We’d love your feedback and issue reports directly through GitHub. Eventually, we will also welcome your pull requests, but are limiting outside contributions until we are better established.
YAML File Format
We adopted a subset of YAML as our file format. Our first priority was a format that was super easy to read and write by humans. But we also wanted something that could be embedded in other places within the Power Platform, and many of them use YAML already or are considering this move. We wanted to leverage existing libraries and tools and not create something completely new.
There are three unique aspects to how we embed within YAML:
All formulas start with a leading =. Just like Excel, the = introduces a formula rather than a static value. We don’t make you write the leading equals in Power Apps Studio but if you notice the formula bar it is always there. The leading = also helped us avoid the normal data type interpretation that YAML does for static value, that is not appropriate for formulas.
Some formulas must be expressed in YAML multi-line. Using the leading = helps us a great deal, but it doesn’t address everything. If you have a formula that contains a string with an embedded #, it is interpreted by YAML as the start of a comment, and the rest of the line will be truncated. In these cases, the formula must be expressed using YAML’s multi-line facilities, most likely being a variant of the | syntax.
Controls are typed with the As keyword. Normally YAML has only a single name to the left of the : when providing a property value. But there is nothing to say that left hand side can’t be more complex and we are taking advantage of this to not only name the property but also provide its type. We know our use of As here is different from how we use it in ForAll and other record scope functions, and we considered lots of other alternatives, but the resounding feedback from early reviews was to stick with what Visual Basic used.
Note that we support only a very specific subset of YAML. Properties with static values, such as trying to set Size: 24 (without a leading =) won’t work. We also deliberately avoided YAML line comments that start with a # because of the confusion they can cause. Over time and based on your feedback we may support more YAML, but for now, it is very restrictive and that is by design.
Here is a simple example form the Hospital Emergency Response solution we shipped last spring. Note that as with all YAML, the indentation level indicates what is inside a container (SplashScreen in this case) and is also used for line continuation of the OnHidden property.
SplashScreen As screen:
    Width: =Max(App.Width, App.DesignWidth)
    Height: =Max(App.Height, App.DesignHeight)
    Size: =1 + CountRows(App.SizeBreakpoints) -
           CountIf(App.SizeBreakpoints, Value >= SplashScreen.Width)
    Orientation: =If(SplashScreen.Width < SplashScreen.Height,
                  Layout.Vertical, Layout.Horizontal)
    OnHidden: |-
              =//Check to see if this is a mobile device if so, then
               save data for all other apps
               //Notify("Trying Save",NotificationType.Information);
               If(
                      Value(AltCheck_Lbl_1.Text) > 0,
                      SaveData(
                             MySplashSelectionsCollection,
                             "MySplashSelections"
                      );
                //Notify("Did Save",NotificationType.Information);
                );
     OnVisible: =Refresh(Systems);Refresh(Regions);

     Splash_Main_Icon As image:
            Image: =SplashIcon
            ZIndex: =1
            HoverFill: =ColorFade(Splash_Main_Icon.Fill, 20%)
            PressedFill: =ColorFade(Splash_Main_Icon.Fill, -20%)
            Height: =499
            Width: =638
            FocusedBorderColor: =Splash_Main_Icon.BorderColor
            HoverBorderColor: =ColorFade(Splash_Main_Icon.BorderColor,
                                20%)
            PressedBorderColor:=ColorFade(Splash_Main_Icon.BorderColor,
                                 -20%)
Directory Structure
Not everything gets the YAML treatment. There are a number of app resources and settings that retain their original not-meant-for-humans treatment and are not intended to be edited outside of Power Apps Studio. The full directory structure and how to deal with merge conflicts in other files is outlined in the GitHub readme.
For the simple one Icon control app that started this blog post, let’s walk through the files we find after PASopa -unpack has done it’s work.
First, let’s look at the files that are the most critical, that truly define the app. These should never be deleted and merges should be handled as you normally would in GitHub:
\src\App.pa.yaml – The *.pa.yaml files are where the formulas are located. This file contains the formulas associated with the app, such as App.OnStart. Since there is nothing set here, this file contains simply App As appinfo.
\src\Screen1.pa.yaml – Control hierarchy and formulas for Screen1. Each screen is broken out individually into a separate file. In our case:
Screen1 As screen:
    Icon1 As icon.Person:
    Icon: =Icon.People
    Width: =1366
    Height: =768
    ZIndex: =1
\CanvasManifest.json – Information about the published app.
\ComponentReferences.json – If this app used any components, they would be listed here. As it does not, it is empty: [ ]
\Assets\resources.xml – Listing of resources embedded in the app. For this simple app it is empty: { “Resources”: [] }.
\Connections\Connections.json – Listing of data sources in this app. For this simple app it is empty: { }.
Next comes files that are boiler plate, copied in when the app was created. Normally these will not change. If the Theme of the app is changed, the entire file will be swapped out.
\Assets\logo.jpg – Logo for the app, referenced in \CanvasManifest.json.
\ControlTemplates.json – Information on three base classes used in this app, the Icon control, the Screen, and the App.
\Other\References\Theme.json – Theme for the app. Each individual color and size is enumerated.
\pkgs\icon_2.3.0.xml – The control template for the one control we used, the Icon control.
Power Apps Studio maintains state between sessions, so you can get back to where you were These can be deleted at any time and are not a concern for merge conflicts.
\src\EditorState\App.editorstate.json – Information about the app.
\src\EditorState\Screen1.editorstate.json – Same as App.editorstate.json, scoped to Screen1.
And finally, there are a set of files that the PASopa tool uses to ensure proper roundtripping of an app between .msapp and source files. It is safe to keep the latest version of these files if there is a merge conflict.
\Other\checksum.json – Checksums of the original files in the .msapp file. This file will not match the layout on the file system that -pack/-unpack read and write, it matches instead the zip file directory structure in the .msapp. This is used internally to detect differences to ensure we are roundtripping correctly.
\Other\entropy.json – A file where we collect all the other bits of information that are needed for us to faithfully roundtrip the app, but can be easily ignored and/or deleted at any time
Source: paper.li


Opmerkingen